紋理拼圖

紋理拼圖
紋理拼圖

2D游戲動画幀, 由多幅關鍵幀(keyFrame) 組成. 逐幀渲染產生動画卡通.『幀動画』亦哎呌『紋理』texture. 将多幅『幀動画』存放係單壹紋理.OpenGL可提高渲染速度, 係显存記憶體1MB年代可能冇用. 事因渲染皆係電脑記憶體運作.

係显存記憶體大幅增長, OpenGL渲染係显存記憶體完成. 减小『紋理』載入量, 單壹紋理存放多幅『幀動画』,可提高渲染速度.

係3D游戲亦可用相同技術提飛渲染效率.

void zoom_textcoord_model3D(TEXTURE_PTR texture,int index,int size,VECTOR2D_PTR dest,VECTOR2D_PTR sour,int count,int flag)


texture 紋理
index 關鍵幀索引
size 關鍵幀寬高解像
dest 纹理隊列
sour 原始纹理隊列
count 纹理頂點量

計單元格

int cell = texture->width / size;

計索引

int  i  = index % cell;// 橫索引
int  j  = index / cell;// 行索引

計缩放率0.0f < zoom < 1.0f

float    zoom    = (float)size / (float)texture->width;

計『幀』偏移.

float offsetX = (float)zoom * (float)i;
float offsetY = (float)zoom * (float)j;

遍歴UV紋理頂㸃

    for (int p = 0; p < count; ++p){

缩細後移動

dest[p].u = sour[p].u * zoom + offsetX ;
dest[p].v = sour[p].v * zoom + offsetY;

纹理返转

if (flag & MODEL3D_TEXTURE_FLIP)

dest[p].v = 1 – (sour[p].v * zoom + offsetY);}


SKYBOX天幕

天幕SKYBOX
天幕SKYBOX
天幕SKYBOX
天幕SKYBOX

『天幕SKYBOX』指巨立方體, 係內籠貼天幕紋理,『天幕紋理』可能係『地平線』『室內』『宇宙』. 『天幕SKYBOX』原㸃與3D相機位置重合. 係遠睇時正确.

由陸幅紋理『顶』『底』『前』『後』『左』『右』組成. 以前『天幕SKYBOX』紋理分陸幅位圖存檔.

陸幅位圖存係單壹『紋理』效率更高. 将『紋理』平分拾陸等分. 足够擺两組『天幕』紋理. 『日頭』『晚黑』各壹. 似上圖咁.

紋理索引:0~15 『日頭』 『晚黑』
顶up 0 8
底dn 1 9
前ft 7 15
后bk 5 13
左lt 6 14
右rt 4 12

定義『天幕SKYBOX』

typedef struct SKYBOX_TYP {
VECTOR3D  pos; 位置
VECTOR3D  rot; 旋轉
TEXTURE_PTR texture; 天幕纹理
float     size; 天幕大细
//TEXTURE_REGION region[16]; 纹理区域
VECTOR3D  vertex_array[36]   ; 天幕顶点
VECTOR2D  texCoord_array[36] ; 天幕紋理
}SKYBOX, *SKYBOX_PTR;

手エ构建『天幕SKYBOX』立方體『3D頂㸃』同『UV紋理』. 正方形以两三角形組成. 紋理左上角[u0, v0], 紋理右下角[u1,v1].天幕大细『size』.

天『UV紋理』 『xyz頂㸃』
texCoord[0]=[u1, v1] vertex_array[0]=[-size, size, -size]
texCoord[1]=[u0, v1] vertex_array[1]=[size, size, -size]
texCoord[2]=[u0, v0] vertex_array[2]=[size, size, size]
texCoord[3]=[u1, v1] vertex_array[3]=[-size, size, -size]
texCoord[4]=[u0, v0] vertex_array[4]=[size, size, size]
texCoord[5]=[u1, v0] vertex_array[5]=[-size, size, size]


地『UV紋理』 『xyz頂㸃』
texCoord[6]=[u1, v1] vertex_array[6]=[size, -size, -size]
texCoord[7]=[u0, v1] vertex_array[7]=[-size, -size, -size]
texCoord[8]=[u0, v0] vertex_array[8]=[-size, -size, size]
texCoord[9]=[u1, v1] vertex_array[9]=[size, -size, -size]
texCoord[10]=[u0, v0] vertex_array[10]=[-size, -size, size]
texCoord[11]=[u1, v0] vertex_array[11]=[size, -size, size]


前『UV紋理』 『xyz頂㸃』
texCoord[12]=[u0, v0] vertex_array[12]=[-size, -size, -size]
texCoord[13]=[u1, v0] vertex_array[13]=[size, -size, -size]
texCoord[14]=[u1, v1] vertex_array[14]=[size, size, -size]
texCoord[15]=[u0, v0] vertex_array[15]=[-size, -size, -size]
texCoord[16]=[u1, v1] vertex_array[16]=[size, size, -size]
texCoord[17]=[u0, v1] vertex_array[17]=[-size, size, -size]


后『UV紋理』 『xyz頂㸃』
texCoord[18]=[u0, v0] vertex_array[18]=[size, -size, size]
texCoord[19]=[u1, v0] vertex_array[19]=[-size, -size, size]
texCoord[20]=[u1, v1] vertex_array[20]=[-size, size, size]
texCoord[21]=[u0, v0] vertex_array[21]=[size, -size, size]
texCoord[22]=[u1, v1] vertex_array[22]=[-size, size, size]
texCoord[23]=[u0, v1] vertex_array[23]=[size, size, size]


右『UV紋理』 『xyz頂㸃』
texCoord[24]=[u1, v0] vertex_array[24]=[size, -size, size]
texCoord[25]=[u1, v1] vertex_array[25]=[size, size, size]
texCoord[26]=[u0, v1] vertex_array[26]=[size, size, -size]
texCoord[27]=[u1, v0] vertex_array[27]=[size, -size, size]
texCoord[28]=[u0, v1] vertex_array[28]=[size, size, -size]
texCoord[29]=[u0, v0] vertex_array[29]=[size, -size, -size]


左『UV紋理』 『xyz頂㸃』
texCoord[30]=[u1, v0] vertex_array[30]=[-size, -size, -size]
texCoord[31]=[u1, v1] vertex_array[31]=[-size, size, -size]
texCoord[32]=[u0, v1] vertex_array[32]=[-size, size, size]
texCoord[33]=[u1, v0] vertex_array[33]=[-size, -size, -size]
texCoord[34]=[u0, v1] vertex_array[34]=[-size, size, size]
texCoord[35]=[u0, v0] vertex_array[35]=[-size, -size, size]


Android Studio-Gradle版本

Android Studio-Gradle版本

同Android Studio更新Android SDK後,  最低支持Gradle版本7.3.3, 當前版本7.0.2

Minimum supported Gradle version is 7.3.3. Current version is 7.0.2.
Please fix the project’s Gradle settings.

Gradle Settings.

撳『Android Gradle Plugin can be upgraded』更新Gradle

Upgrade Android Gradle Plungin from version 7.0.2 to 7.2.0

下載Gradle7.3.3

Gradle: Download gradle-7.3.3-bin.zip


Android两指縮放

Android两指縮放
Android两指縮放

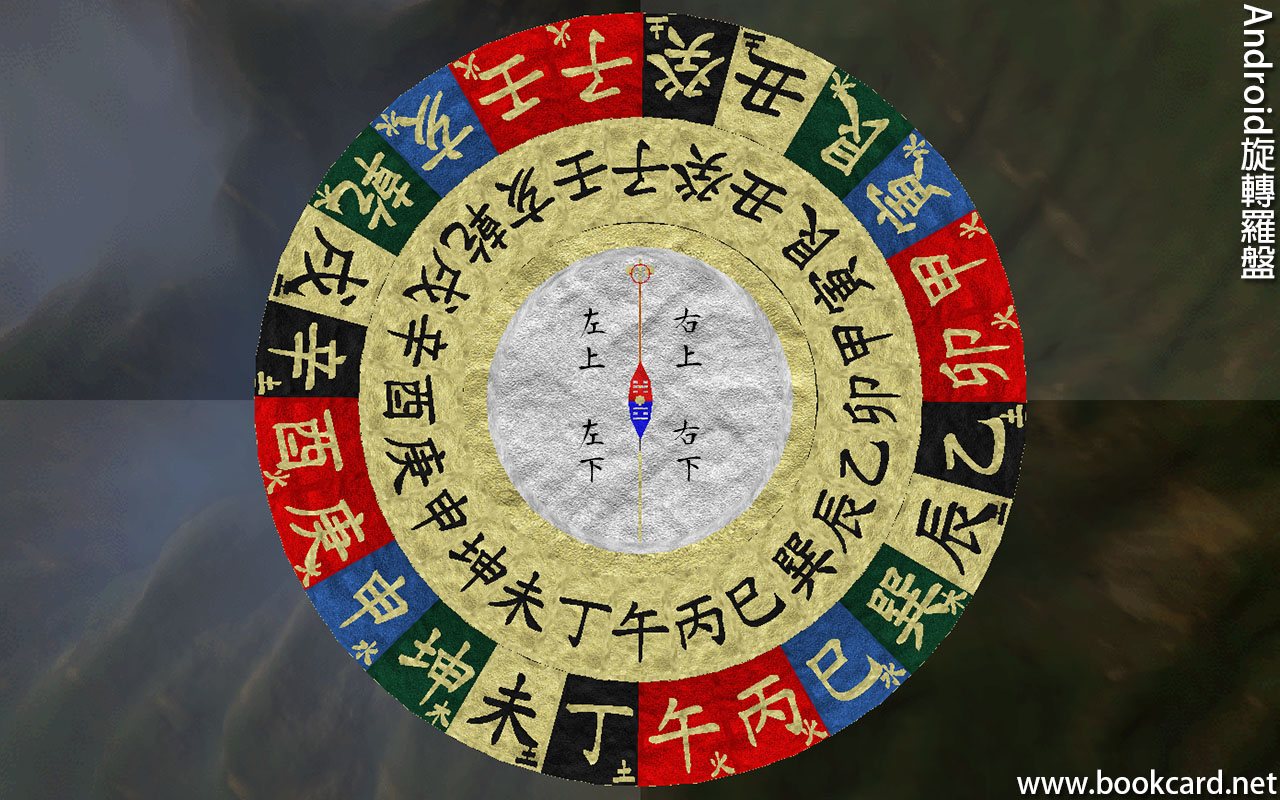
之前做Android 游戲皆单㸃触摸, 諗住係風水羅盤實現两指縮放.

触摸分叁動作『鬆』『撳』『拖』.

動作 注释
#define TOUCH_UP      1
#define TOUCH_DOWN    2
#define TOUCH_DRAGGED 3

雙手拾指, 除非用埋脚指

#define MAX_FINGER    10 拾指

定義TOUCH結构, 用蒞存拾指『方位』同『動作』

TOUCH結构 注释
typedef struct TOUCH_STR{
    int count; 手指量, 最多10指
    int action[MAX_FINGER]; 動作
    int x[MAX_FINGER]; X座標
    int y[MAX_FINGER]; Y座標
}TOUCH,*TOUCH_PTR;

用栈stack蒞存触摸,

#define MAX_TOUCH     32 棧高32
TOUCH touch_array[MAX_TOUCH] ; 触摸棧
int   touch_count; 棧頂

棧頂加壹, 每次存触摸『方位』同『動作』前調用

int Add_Touch(){

TOUCH_PTR touch;

int index;

if(touch_count >= MAX_TOUCH)

return touch_count;

index = touch_count;

++touch_count;// 棧頂加壹

touch = &touch_array[index];

touch->count = 0;

return touch_count;

}

棧頂减壹, 讀『方位』同『動作』後調用

int Sub_Touch(){

if(touch_count <= 0)

return touch_count;

–touch_count;

return touch_count;

}

存触摸『方位』同『動作』, finger係手指索引

bool Set_Touch(int finger,int action,float x,float y){

int index;

TOUCH_PTR touch;

index = touch_count-1; // 棧頂

touch = &touch_array[index];

if(touch->count < finger + 1)

touch->count = finger + 1;

touch->action[finger] = action;

touch->x[finger] = x ;

touch->y[finger] = y ;

return true;

}

讀触摸, 『方位』同『動作』, finger係手指索引

bool Get_Touch(int finger,int * action,int * x,int * y){

TOUCH_PTR  touch;

int index;

if(touch_count == 0)

return false;

index = touch_count – 1;

touch = &touch_array[index];

*action = touch->action[finger];

*x = touch->x[finger];

*y = touch->y[finger];

return true;

}

計两指(x0,y0)(x1,y1)縮放時中心位(cx,cy)

float cx = (x0 – x1)/2 + x1;
float cy = (y0 – y1)/2 + y1;

2D触摸坐标转屏幕坐标

VECTOR2D touchPoint2D; 2D触摸點(x,y)
VECTOR3D touchPoint3D; 3D触摸點(x,y,z)

触摸坐标转3D世界坐标

Init_VECTOR2D(&touchPoint2D, cx, cy);
TouchToWorld(camera3D, &touchPoint2D, &touchPoint3D);

計两指距,

Init_VECTOR2D(&v0,x0,y0);
Init_VECTOR2D(&v1,x1,y1);
Sub_VECTOR2D(&vdiff,&v0,&v1);
length = Length_VECTOR2D(&vdiff);

指距拉開放大, 两指行埋縮細. 通過移3D相機實現縮放.

if(_length > length ) y = Camera3D.pos.y + 2; 縮細
if(_length < length ) y = Camera3D.pos.y – 2; 放大


Android-360度旋轉羅盤

Android-360度旋轉羅盤
Android-360度旋轉羅盤

自首台Android手機面世, 已標配熒幕觸摸. 旋轉羅盤以天池為原㸃分肆象限.

  1. 係觸屏拖動得到兩觸摸坐標, (x0,y0) 觸摸點. (_x0,_y0) 上壹觸摸點.
  2. 将(x0,y0) 同(_x0,_y0) 歸壹, 即長為壹,方位唔變.
  3. 㸃(x0,y0) ,(_x0,_y0) 同天池原㸃(0,0). 形成『等腰三角』, 腰長壹.
  4. 計㸃(x0,y0) ,(_x0,_y0) 距离, 得到『等腰三角』 底長『length』
  5. 『等腰三角』由两『直角三角』組成
  6. 計『直角三角』原㸃夹角
sin(a)= 對邊/斜邊
a = asinf(對邊/斜邊)
  1. 『旋轉角』= asinf((length / 2) / 1) * 2
angle = RAD_TO_DEG( asinf((length / 2.0f) / 1.0f) ) * 2.0f;
  1. 判轉向
笛卡兒坐標 象限
if( v0.y > 0 && v0.x > _v0.x) length = -length; 逆轉
if( v0.y < 0 && v0.x < _v0.x)length = -length; 逆轉
  1. 旋轉Y軸
rot.y = (int)(rot.y + angle) % 360;


Android Studio-『app:externalNativeBuildCleanDebug FAILED』

Android Studio-『app:externalNativeBuildCleanDebug FAILED』

琴日Android Studio係Build果陣,Win10冇端端死機, 重啟後『Clean Project』『Rebuild Project』皆現『app:externalNativeBuildCleanDebug FAILED』

> Task :app:externalNativeBuildCleanDebug FAILED

Execution failed for task ‘:app:externalNativeBuildCleanDebug’.

> com.google.gson.stream.MalformedJsonException: Use JsonReader.setLenient(true) to accept malformed JSON at line 1 column 1 path $


* Try:

Run with –stacktrace option to get the stack trace. Run with –info or –debug option to get more log output. Run with –scan to get full insights.

Use JsonReader.setLenient(true) to accept malformed JSON at line 1 column 1 path $

問題明显,係寫入時果陣死機. 破壞文档数据, 解决方案係刪『build』資料夾, 再撳『Rebuild Project』 等『Androd studio』重建『build』即可

1.刪『App』->『build』資料夾
2.撳『build』->『Rebuild Project』


Android Studio NDK-assets遍歷文檔

謎語之摸蒞又冇烈
謎語之摸蒞又冇烈

assets讀文檔, 如果有大量文檔,要逐壹畀文檔路徑蒞讀, 更佳係『assets 裏邊.

將『文檔』擺係『檔案夾』. 然後遍歷『文檔』.

訪問『assets』檔案夾

AAssetDir * assetDir;

開啟文檔夾, dir』係『assets 裏邊

assetDir = AAssetManager_openDir(assetManager,dir);

失敗返回NULL

if(assetDir == NULL)

        return false;

遍歷文檔,

while((filename = AAssetDir_getNextFileName(assetDir)) != NULL) {

組合『assets』『文檔』路徑.

sprintf(path, “%s/%s”, dir, filename);

閂檔案夾

AAssetDir_close(assetDir);


Android Studio NDK-OpenGL ES 觸屏坐標轉游㱆坐標

Android Studio NDK-OpenGL ES 觸屏坐標轉游㱆坐標

觸屏坐標』『x,y』坐標轉『正交投影』坐標, 『視錐體解像』寬高, 比例需手機解像寬高比壹致.

計屏幕寬高比

float aspect_ratio = (float)cam->real_width / (float)cam->real_height;

『視錐體解像』寬高,此時定義『高』800pix

float frustum_width    = 800 *aspect_ratio;
float frustum_height   = 800 ;


『正交投影』代碼

重置視區尺寸, 值係手機解像寬高

::glViewport(0,0,real_width,real_height);

設定投影矩陣

::glMatrixMode(GL_PROJECTION);

載入單位矩陣

::glLoadIdentity();

正交投影, 游戲坐標原點(0,0,0)為於屏幕中心

glOrthof(frustum_width / 2, frustum_width / 2, -frustum_height / 2, frustum_height / 2, pos.y – 10, far_clip_z);

設定模型視圖矩陣

::glMatrixMode(GL_MODELVIEW);

載入單位矩陣

::glLoadIdentity();


手指触摸手機屏幕onTouch() 所得坐標需轉游戲世界坐標,正交投影OpenGL游㱆+Z軸指向屏幕深處.

float touch3Dx = (touch2Dx / real_width) * frustum_width  ;
float touch3Dz = (touch2Dy /real_height) * frustum_height  ;

計3D相機位置

touch3Dx = touch3Dx + camPosX;
touch3Dz = touch3Dz + camPosX;

游戲坐標原點(0,0,0)為於屏幕中心

touch3Dx = touch3Dx – (frustum_width / 2.0f);
touch3Dz = touch3Dz – (frustum_height / 2.0f);


Android Studio NDK-OpenGL ES 漢字位圖字庫

Android Studio NDK-OpenGL ES 漢字位圖字庫

『漢字字庫』同 『ASCII字庫』原理同, 字庫『竪排』, 漢字『32*32』pixel, 『竪』32漢字.

由上至下,由右至左排列.可填1024字符,每色8Bit. 即『索引色』『調色板』.

准備庫位圖

  1. 白紙黑字,
  2. 白色係透明色. 黑色係變換色.

Photoshop轉為『索引色』

  1. 『影像』->『模色』->『索引色』
  2. 『色盤』揀『正確』.
  3. 『顏色』量3
  4. 『强制』揀『黑白』
  5. 『透明』勾選
  6. 存為『.pcx』或『.bmp』

止時圖檔『調色板』共有三色『黑』『白』『透明』.

IMAGE-SIZE 1024*1024
FONT-SIZE 30pt
FONT 衡山毛筆フォント
FONT-PIXEL 32pixel*32pixel
影像-模色 索引色
色盤 正確
顏色 3
强制 黑白
透明 勾選

『調色板』結构同DirextX唔同, 將flags存alpha『透明值』0~255,0係『透明』,255係『實心』

typedef struct PALETTE_TYP {

BYTE red;

BYTE green;

BYTE blue;

BYTE flags;//alpha

} PALETTE,COLOR,* PALETTE_PTR,*COLOR_PTR;

設置『調色板』顏色

#define INIT_PALETTE(palette,r,g,b,a) {(palette).red=(r); (palette).green=(g); (palette).blue=(b); (palette).flags=(a);}

黑字『調色板』設置

index red green blue Alpha
253 0xff 0xff 0xff 0x00
255 0x00 0x00 0x00 0xFF*0.5f

白字『調色板』設置

index red green blue Alpha
253 0x00 0x00 0x00 0x00
255 0xff 0xff 0xff 0xFF*0.5f

半透明,激活混合

glEnable(GL_BLEND);

設混合模式, 渲染時Alpha值混合.

glBlendFunc(GL_SRC_ALPHA, GL_ONE_MINUS_SRC_ALPHA);

激活透明测试

glEnable(GL_ALPHA_TEST);

Alpha=0時, 過濾背影色

glAlphaFunc(GL_GREATER, 0);