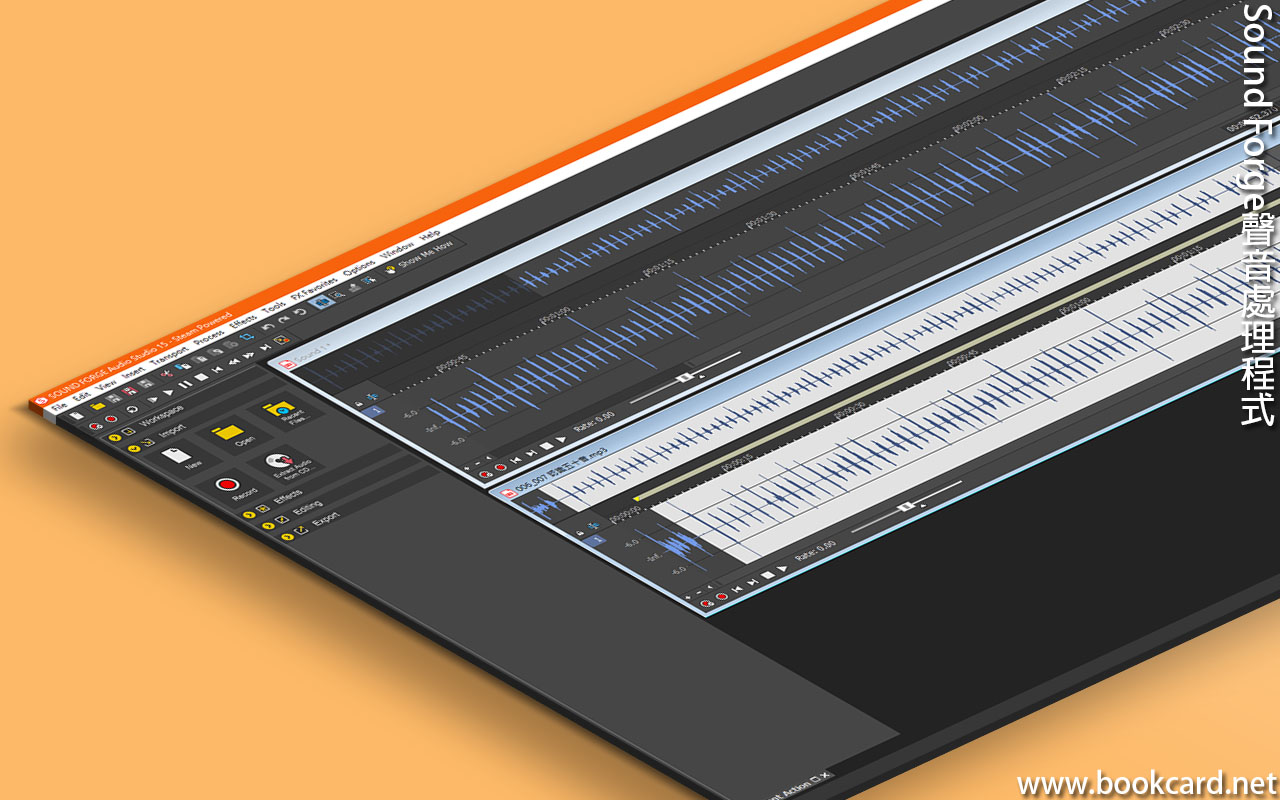
諗住剪日語五辻聲带片頭,係學電腦初年『andre LaMothe』講過『Sound Forge』易入門,且聲音處理佢至掂.拖入原始聲音檔
- 用滑鼠拖選聲带片頭
- 撳『EDIT』->『CUT』
- 撳『File』->『Save As』
- 『存檔類型揀』揀『MP3 Audio(*.mp3)』
- 撳『Save』存為

BOOKCARD
諗住剪日語五辻聲带片頭,係學電腦初年『andre LaMothe』講過『Sound Forge』易入門,且聲音處理佢至掂.拖入原始聲音檔

『Stable Diffusion』與GitHub倉庫同步更新.

當睇到下面信息『Stable Diffusion』已装掂,但係缺『基礎模型』.
| No checkpoints found. When searching for checkpoints, looked at: |
| – file C:\stable-diffusion-webui\model.ckpt |
| – directory C:\stable-diffusion-webui\models\Stable-diffusion |
| Can’t run without a checkpoint. Find and place a .ckpt file into any of those locations. The program will exit. |
先去『civitai.com』下載模型
| https://civitai.com/ |
| https://huggingface.co/ |
係『Stable Diffusion』左上角揀基礎模型.擴展名『.safetensors』『.ckpt』, 大細係6GB~4GB之間. 『基礎模型』吾可叠加.
『基礎模型』擺係指定檔案夾.
| Model模型 | 檔案夾位置 |
| Checkpoint『.ckpt』 | C:\stable-diffusion-webui\models\Stable-diffusion |
| .safetensors | C:\stable-diffusion-webui\models\Stable-diffusion |
『基礎模型』添加封面,圖檔名與模型名壹致,同『基礎模型』模型擺係壹起,之後撳『refresh page』刷新.
| 基礎模型 | model.safetensors |
| 封面圖 | model.png |


『Stable Diffusion』開源AI划畫畵程式. 輕易係網络下載,部署係電腦行.
| https://github.com/AUTOMATIC1111/stable-diffusion-webui |
『提示詞』畀『Clip』解讀, 『Diffusion』逐步生成圖像.
| 『提示詞』->『Clip』->『Diffusion』->『VAE』->『畵』 |
硬件要求
部署運行環境.
部署Stable Diffusion
| git clone https://github.com/AUTOMATIC1111/stable-diffusion-webui |
| “C:\Program Files\Python310\python.exe” |
| @echo off |
| set PYTHON=”C:\Program Files\Python310\python.exe” |
| set GIT= |
| set VENV_DIR= |
| set COMMANDLINE_ARGS=–xformers |
| call webui.bat |
| ERROR:Could not find a version that satisfies the requirement torch |
| ERROR:NO matching distribution found for torch |
| WARNING:There was an error checking the latest version of pip. |
| python -m pip install –upgrade pip |
| C:\stable-diffusion-webui\venv\Scripts\python.exe -m pip install –upgrade pip |
| RuntimeError: Torch is not able to use GPU; add –skip-torch-cude-test to COMMANDLINE_ARGS variable to disable this check |
| set COMMANDLINE_ARGS=–xformers –skip-torch-cuda-test |
| RuntimeError: Couldn’t install gfpgan. |
| RuntimeError: Couldn’t install clip. |
| RuntimeError: Couldn’t install open_clip. |
| OSError: Can’t load tokenizer for ‘openai/clip-vit-large-patch14’. If you were trying to load it from ‘https://huggingface.co/models’, make sure you don’t have a local directory with the same name. Otherwise, make sure ‘openai/clip-vit-large-patch14’ is the correct path to a directory containing all relevant files for a CLIPTokenizer tokenizer. |
| TypeError: AsyncConnectionPool.__init__() got an unexpected keyword argument ‘socket_options’ |
| ImportError: cannot import name ‘_compare_version’ from ‘torchmetrics.utilities.imports’ (C:\stable-diffusion-webui\venv\lib\site-packages\torchmetrics\utilities\imports.py) |
| Downloading: “https://huggingface.co/runwayml/stable-diffusion-v1-5/resolve/main/v1-5-pruned-emaonly.safetensors” to C:\stable-diffusion-webui\models\Stable-diffusion\v1-5-pruned-emaonly.safetensors |
| C:\stable-diffusion-webui\venv |
| Running on local URL: http://127.0.0.1:7860 |

安裝『Stable Diffusion』時未有安裝『open-clip-torch』
| changing setting sd_model_checkpoint to v1-5-pruned-emaonly.safetensors [6ce0161689]: AttributeError
Traceback (most recent call last): |
| AttributeError: ‘NoneType’ object has no attribute ‘lowvram’ |
| pip install open-clip-torch==2.20.0 |
| C:\stable-diffusion-webui\venv\Scripts\python.exe -m pip install open-clip-torch==2.20.0 |

『Stable Diffusion』冇自带模型,需自行下載,當妳睇到下面信息,下載『v1-5-pruned-emaonly.safetensors』, 之后擺係『C:\stable-diffusion-webui\models\Stable-diffusion\』資料夾.
| Downloading: “https://huggingface.co/runwayml/stable-diffusion-v1-5/resolve/main/v1-5-pruned-emaonly.safetensors” to C:\stable-diffusion-webui\models\Stable-diffusion\v1-5-pruned-emaonly.safetensors |
| https://huggingface.co/runwayml/stable-diffusion-v1-5/resolve/main/v1-5-pruned-emaonly.safetensors | Sour |
| C:\stable-diffusion-webui\models\Stable-diffusion\v1-5-pruned-emaonly.safetensors | dest |


當妳『Stable Diffusion』睇到下面信息,未有裝『transformers』模型分詞器.或版本舊.
| OSError: Can’t load tokenizer for ‘openai/clip-vit-large-patch14’. If you were trying to load it from ‘https://huggingface.co/models’, make sure you don’t have a local directory with the same name. Otherwise, make sure ‘openai/clip-vit-large-patch14’ is the correct path to a directory containing all relevant files for a CLIPTokenizer tokenizer. |
| pip install transformers |
| C:\stable-diffusion-webui\venv\Scripts\python.exe -m pip install transformers |
| pip install –upgrade transformers |
| C:\stable-diffusion-webui\venv\Scripts\python.exe -m pip install –upgrade transformers |

安裝『Stable Diffusion』時未有裝『torchmetrics』.
| ImportError: cannot import name ‘_compare_version’ from ‘torchmetrics.utilities.imports’ (C:\stable-diffusion-webui\venv\lib\site-packages\torchmetrics\utilities\imports.py) |
進入『命令行模式CMD』
查版本號
| pip show torchmetrics |
缷載
| pip uninstall torchmetrics |
下載0.11.4版本
| C:\stable-diffusion-webui\venv\Scripts\python.exe -m pip install torchmetrics==0.11.4 |

安裝『Stable Diffusion』時報錯
| TypeError: AsyncConnectionPool.__init__() got an unexpected keyword argument ‘socket_options’ |
| C:\stable-diffusion-webui\venv\Scripts\python.exe -m pip install httpx==0.24.1 -force-reinstall |
| python.exe -m pip install httpx==0.24.1 -force-reinstall |

安裝『Stable Diffusion』時未裝『open_clip』. 其實亦係『clip』
| RuntimeError: Couldn’t install open_clip. |
進入『open_clip』
| https://github.com/mlfoundations/open_clip |
或者下載『open_clip』落『C:』碟
| git clone https://github.com/openai/open_clip.git |
下載『open_clip-main.zip』後解壓本地安裝
| https://codeload.github.com/mlfoundations/open_clip/zip/refs/heads/main |
复制『C:\open_clip』到『C:\stable-diffusion-webui\venv\Scripts』
| C:\open_clip | Sour |
| C:\stable-diffusion-webui\venv\Scripts | dest |
進入『命令行模式CMD』
CD去『CLIP』檔䅁夾, 作為本地路徑
| cd C:\stable-diffusion-webui\venv\Scripts\open_clip |
执行下列安裝指令
| C:\stable-diffusion-webui\venv\Scripts\python.exe setup.py build install |
常試通過pip指令安裝
| pip install open_clip_torch |

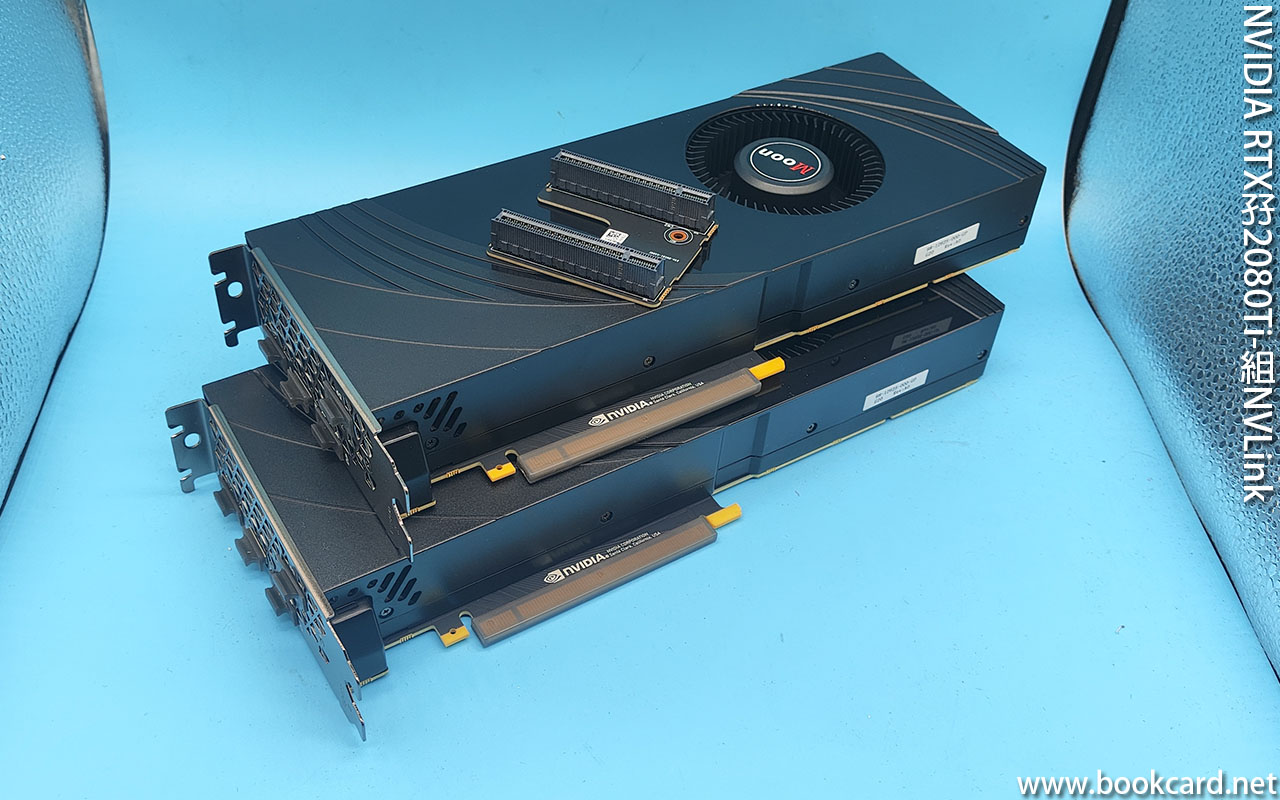
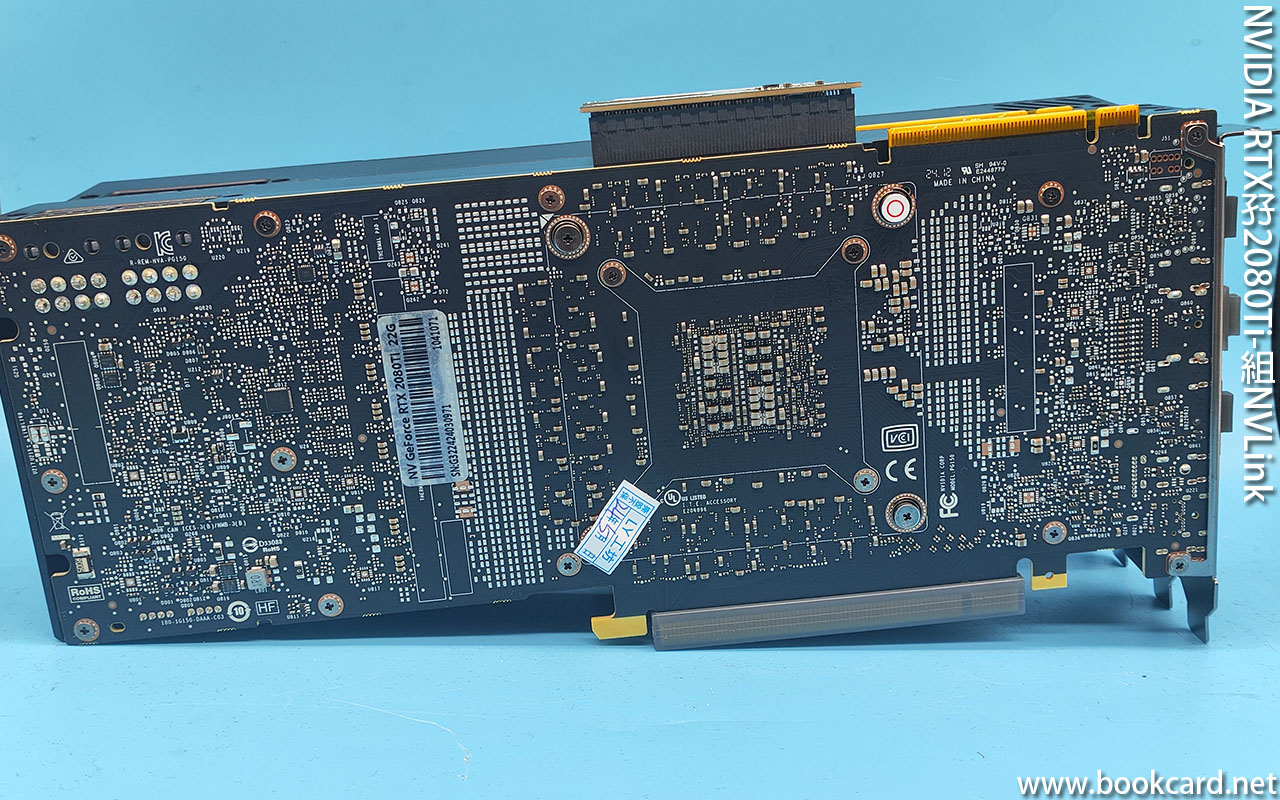
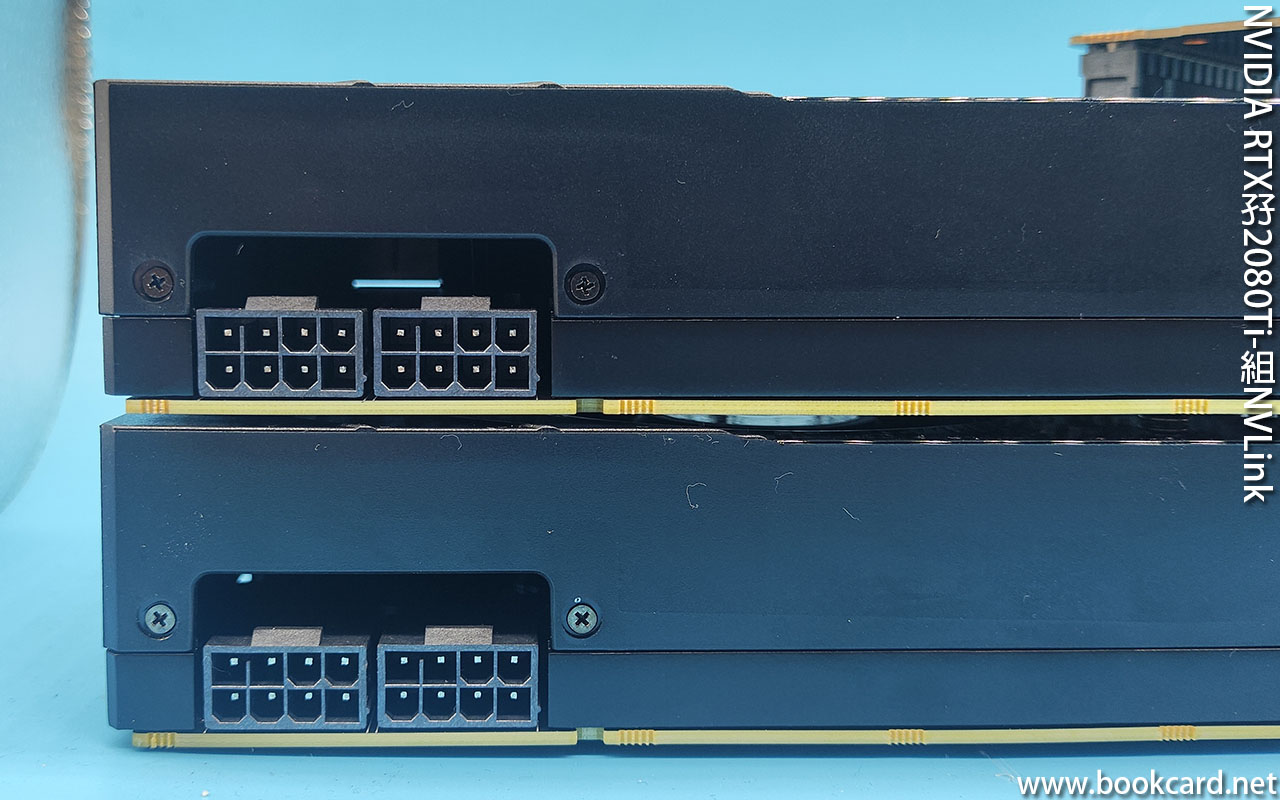
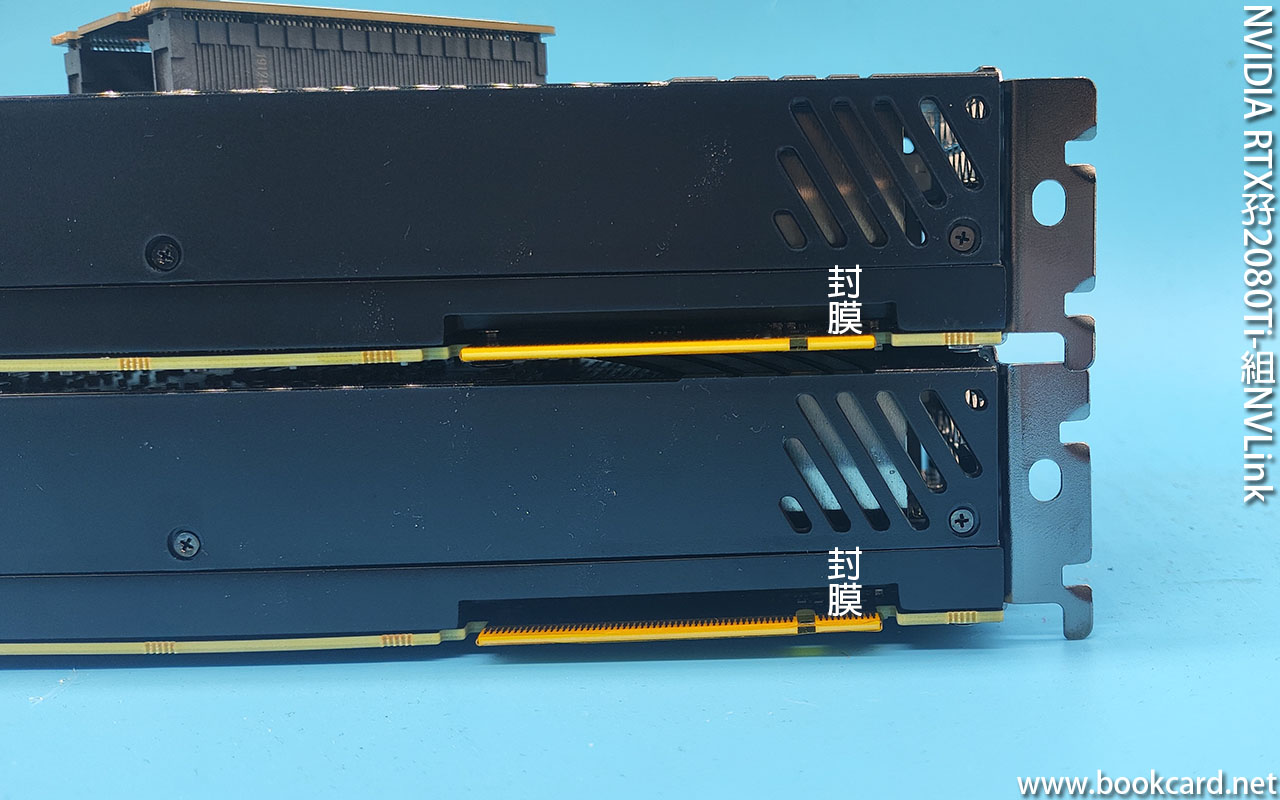
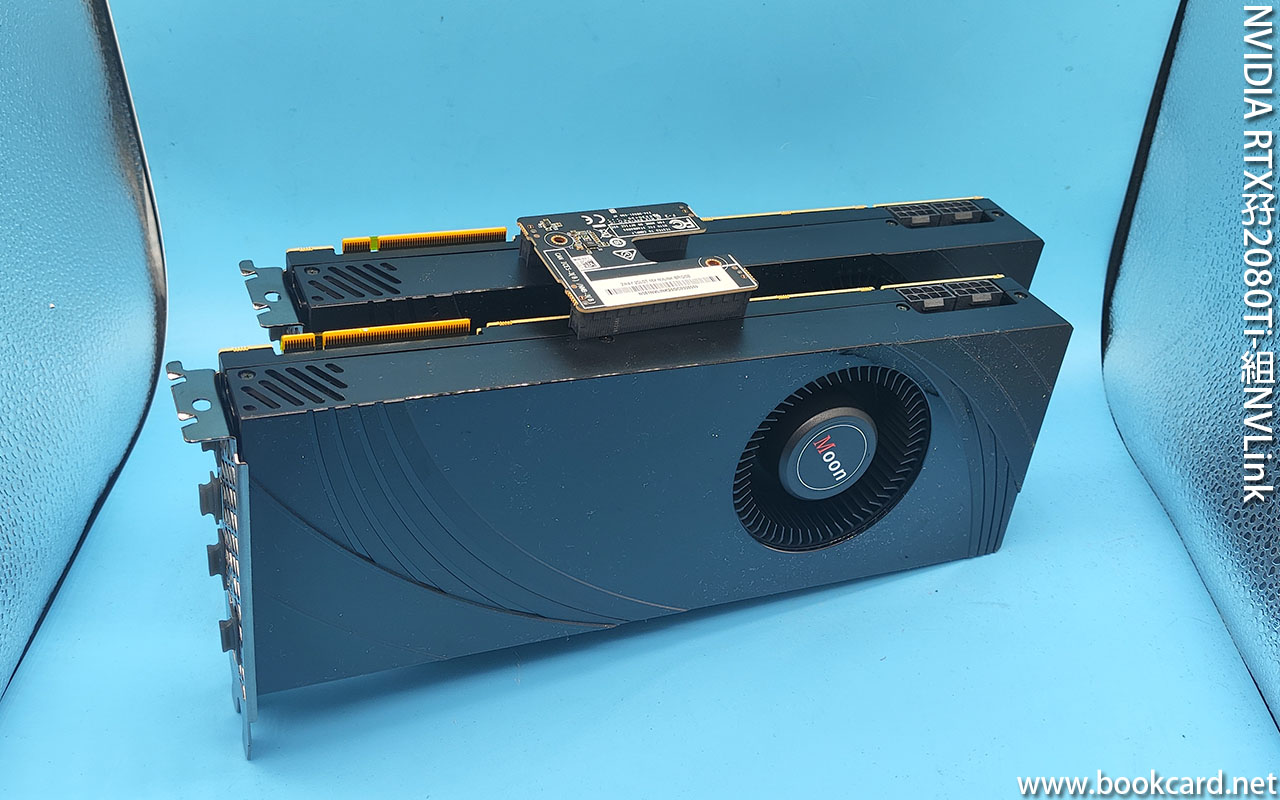

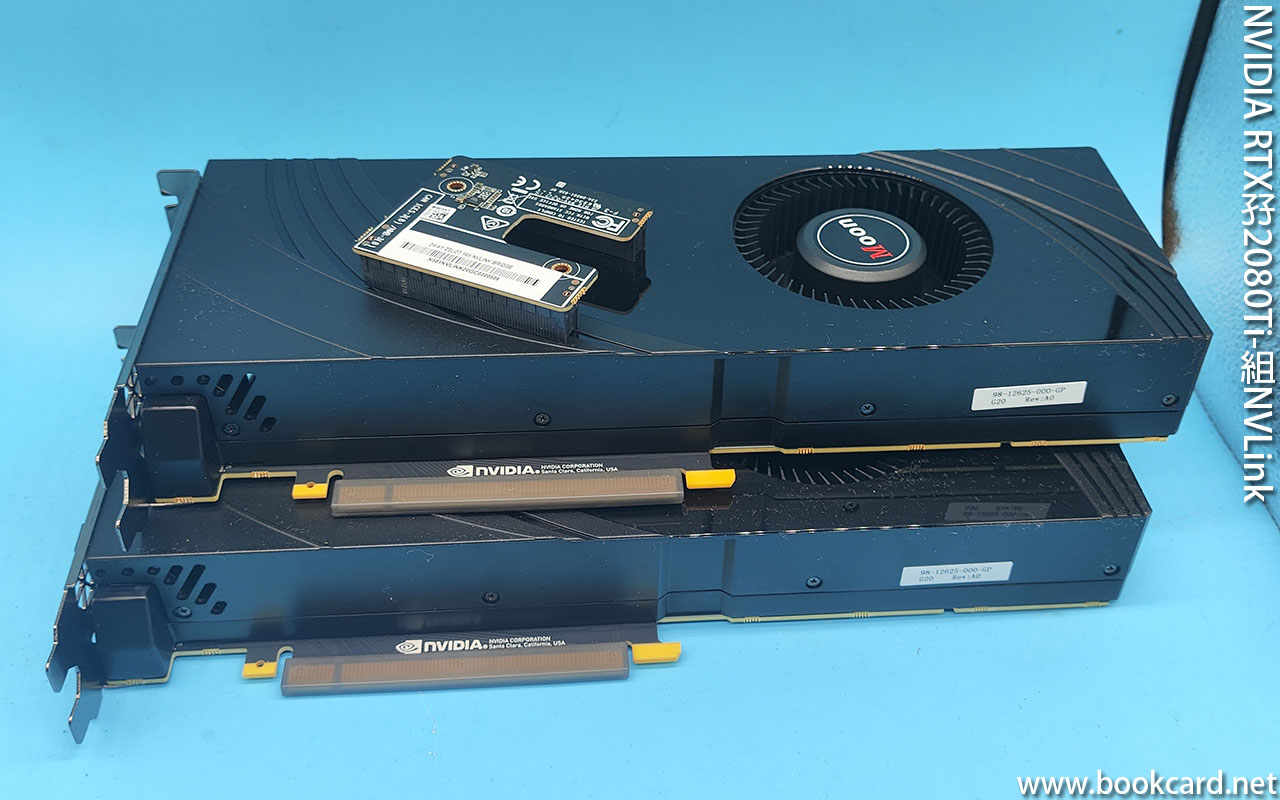
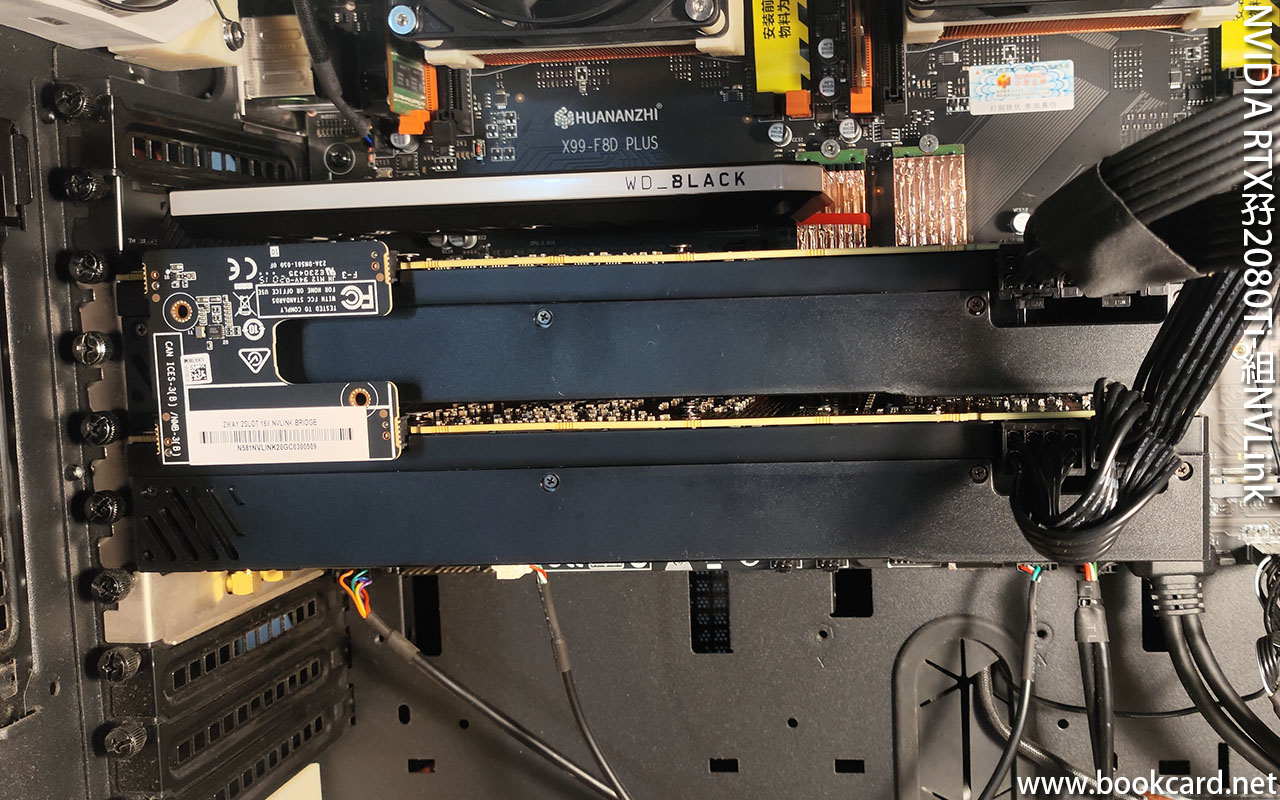


諗住買3090Ti點知連成萬,孖2080Ti送NVLink先陸千有找.
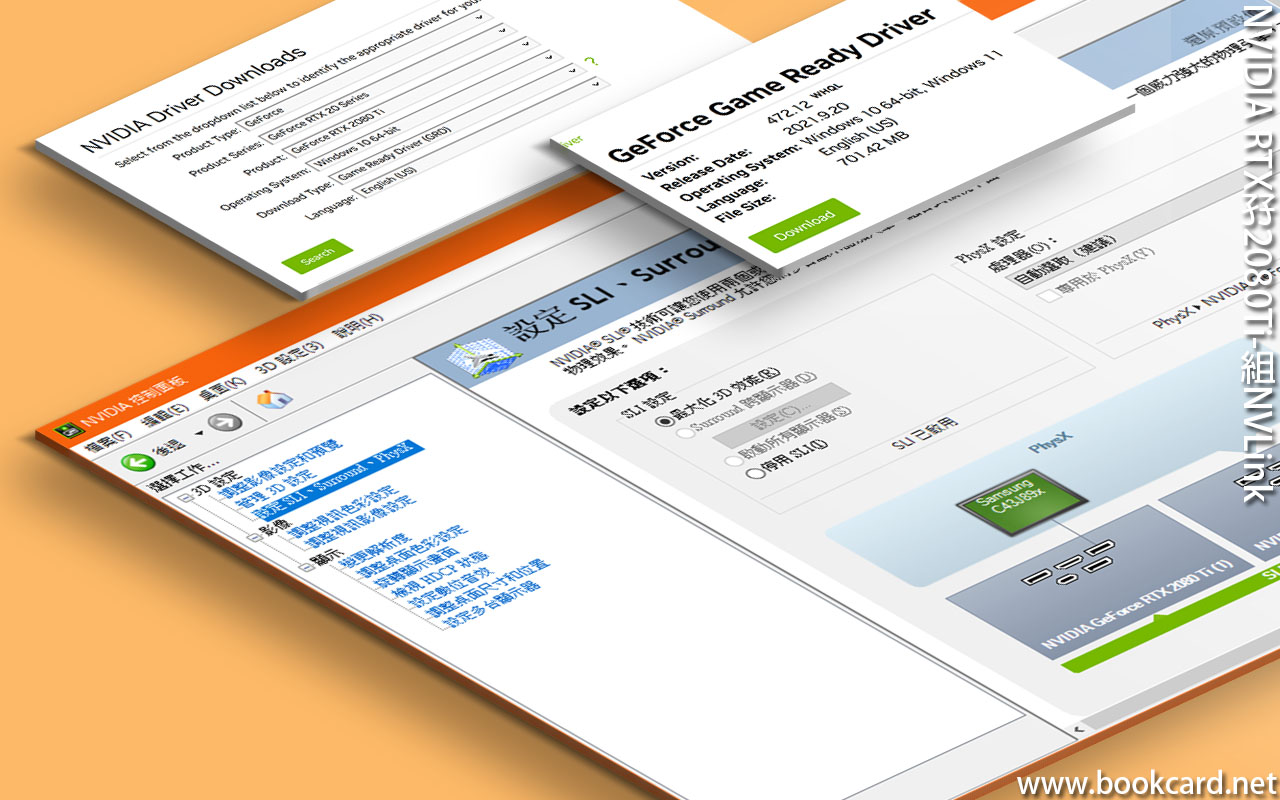
登入NVIDIA官網下載嘉時至新驅動
| https://www.nvidia.com/Download/index.aspx?lang=en-us |
| 填NVIDIA Driver Downloads | |
| NVIDIA Driver Downloads | 揀 |
| Product Type | GeForce |
| Product Series | GeForce RTX 40 Series |
| Product | GeForce RTX 4090 Ti |
| Operating System | Windows 10 64-bit |
| Download Type | NVIDIA Studio Driver |
撳Search下載驅動
| https://us.download.nvidia.com/Windows/552.22/552.22-desktop-win10-win11-64bit-international-nsd-dch-whql.exe |
新顯卡NVLINK金手指有封膜,撕左插入NVLINK桥即掂.冇使搞BIOS.
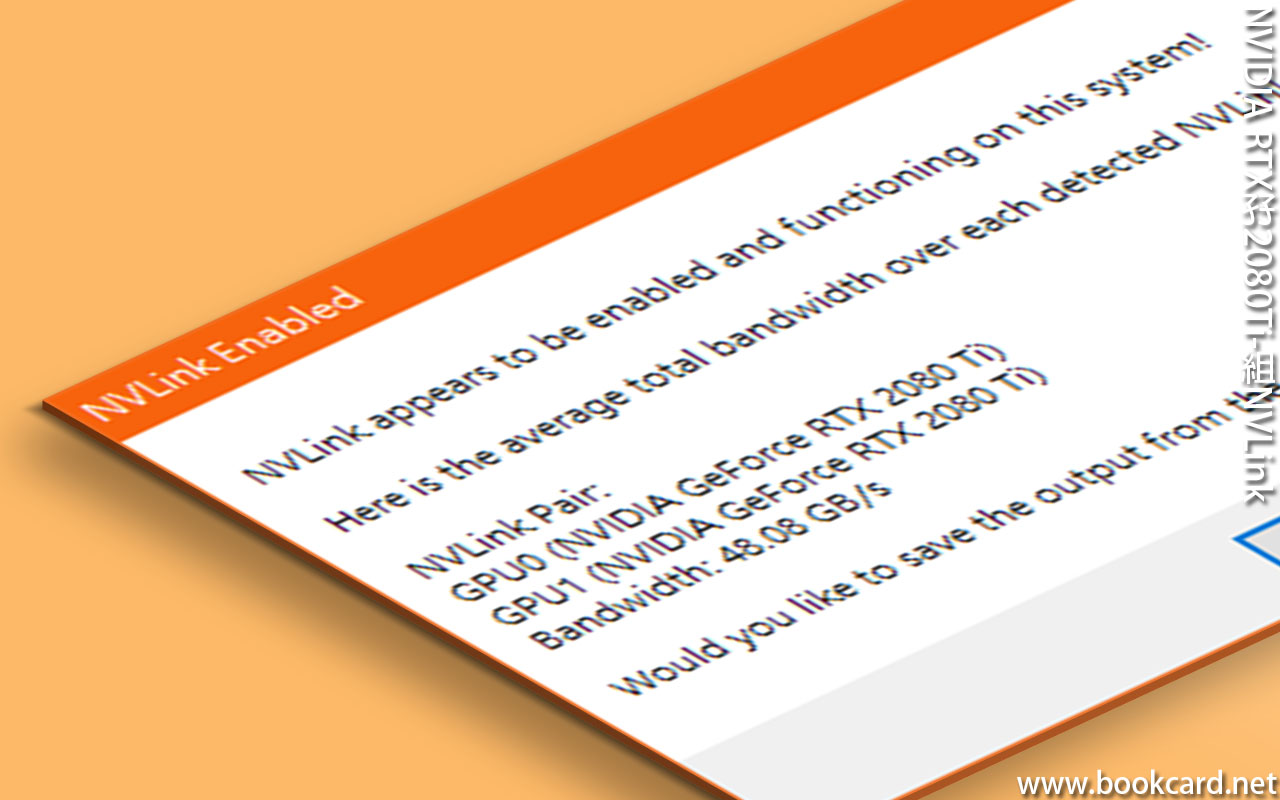
下載『NVLinkTestCUDA11』測試NVLINK桥造總線带寛
| https://www.pugetsystems.com/support/guides/how-to-enable-and-test-nvidia-nvlink-on-quadro-and-geforce-rtx-cards-in-windows-10-1266/ |
| https://puget.systems/go/NVLinkTestCUDA11 |
孖『NVIDIA GeForce RTX 2080 Ti』都插係PCIEx16,鋪頭送『GeForce NVLINK』桥造總線带寛得『48.08GB/S』, 可能要『Quadro Nvlink』先有『100GB/S』带寛.


『clip』建构圖像文字之間連系模型,安裝『Stable Diffusion』時未有安裝『clip』.
| RuntimeError: Couldn’t install clip. |
進入『clip』
| https://github.com/openai/clip/ |
下載『clip』落『C:』碟
| git clone https://github.com/openai/CLIP.git |
或者下載『CLIP-main.zip』後解壓
| https://codeload.github.com/openai/CLIP/zip/refs/heads/main |
复制『C:\CLIP』到『C:\stable-diffusion-webui\venv\Scripts』
| C:\CLIP | Sour |
| C:\stable-diffusion-webui\venv\Scripts | dest |
進入『命令行模式CMD』
CD去『CLIP』檔䅁夾, 作為本地路徑
| cd C:\stable-diffusion-webui\venv\Scripts\CLIP |
执行下列安裝指令
| C:\stable-diffusion-webui\venv\Scripts\python.exe setup.py build install |

安裝『Stable Diffusion』時未有安裝『gfpgan』人樣修复.
| RuntimeError: Couldn’t install gfpgan. |
進入『GFPGAN』
| https://github.com/TencentARC/GFPGAN |
下載『GFPGAN』落『C:』碟
| git clone https://github.com/TencentARC/GFPGAN.git |
复制『C:\GFPGAN』到『C:\stable-diffusion-webui\venv\Scripts』
| C:\GFPGAN | Sour |
| C:\stable-diffusion-webui\venv\Scripts | dest |
進入『命令行模式CMD』
CD去『GFPGAN』檔䅁夾, 作為本地路徑
| cd C:\stable-diffusion-webui\venv\Scripts\GFPGAN |
执行下列安裝指令
| C:\stable-diffusion-webui\venv\Scripts\python.exe -m pip install basicsr |
| C:\stable-diffusion-webui\venv\Scripts\python.exe -m pip install facexlib |
| C:\stable-diffusion-webui\venv\Scripts\python.exe -m pip install -r requirements.txt |
| C:\stable-diffusion-webui\venv\Scripts\python.exe setup.py develop |
| C:\stable-diffusion-webui\venv\Scripts\python.exe -m pip install realesrgan |


『Torch』基於神經網络人工智慧輵, 『PyTorch』係『Python』版本
首先确認NVIDIA顯卡支持CUDA版本. 下載最新顯卡驅動『552.22-desktop-win10-win11-64bit-international-nsd-dch-whql.exe』
網络安装『PyTorch』
| pip3 install torch torchvision torchaudio –index-url https://download.pytorch.org/whl/cu121 |
本地安装『PyTorch』
| https://download.pytorch.org/whl/torch/ |
| https://download.pytorch.org/whl/cu121/torch-2.3.0%2Bcu121-cp310-cp310-win_amd64.whl#sha256=002027d18a9c054f08fe9cf7a729e041229e783e065a71349015dcccc9a7137e |
| WARNING:There was an error checking the latest version of pip. |
| Defaulting to user installation because normal site-packages is not writeable |
| python -m pip install –upgrade pip |
測試『Pytorch』返回true,表示可調用GPU-CUDA指令, 進入『Pytho3.10』.
| import torch |
| print(torch.__version__) |
| torch.cuda.is_available() |
缷載tcrch
| Pip uninstall torch |
| Pip uninstall torchaudio torchvision |
| Pip uninstall torch-geometric torch-scatter torch-sparse torch-cluster torch-spline-conv |
| https://pytorch.org/get-started/locally/ |
| https://pytorch.org/get-started/previous-versions/ |


睇人AI繪畫,諗住買NVIDIA顯卡,中古RTX3060都要兩千幾,
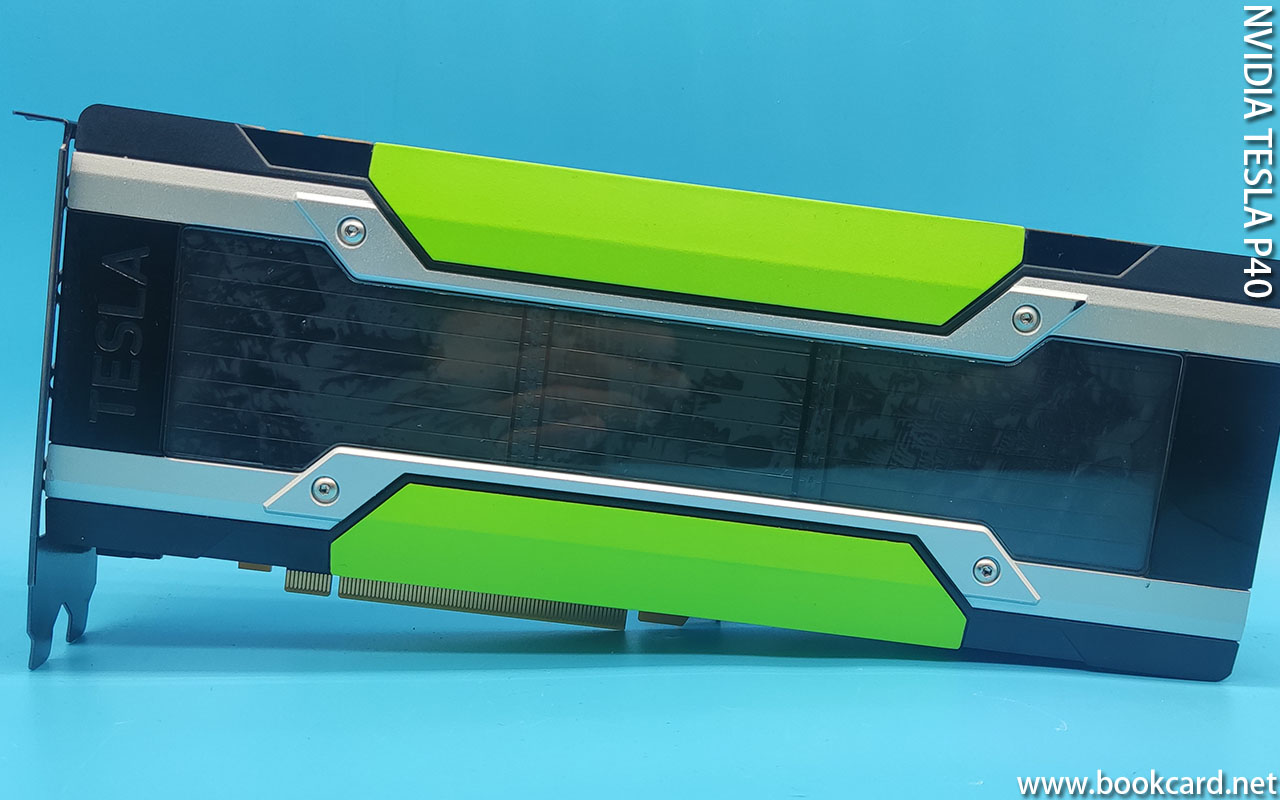
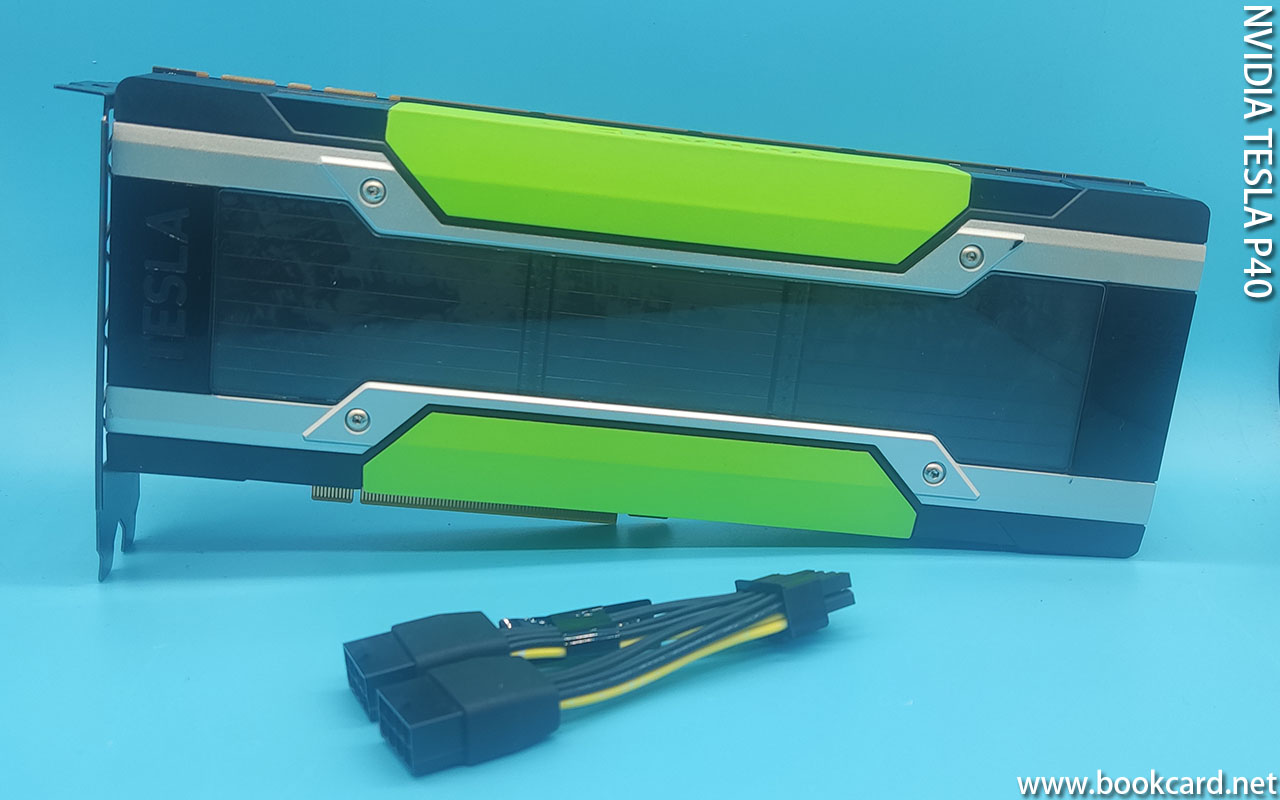
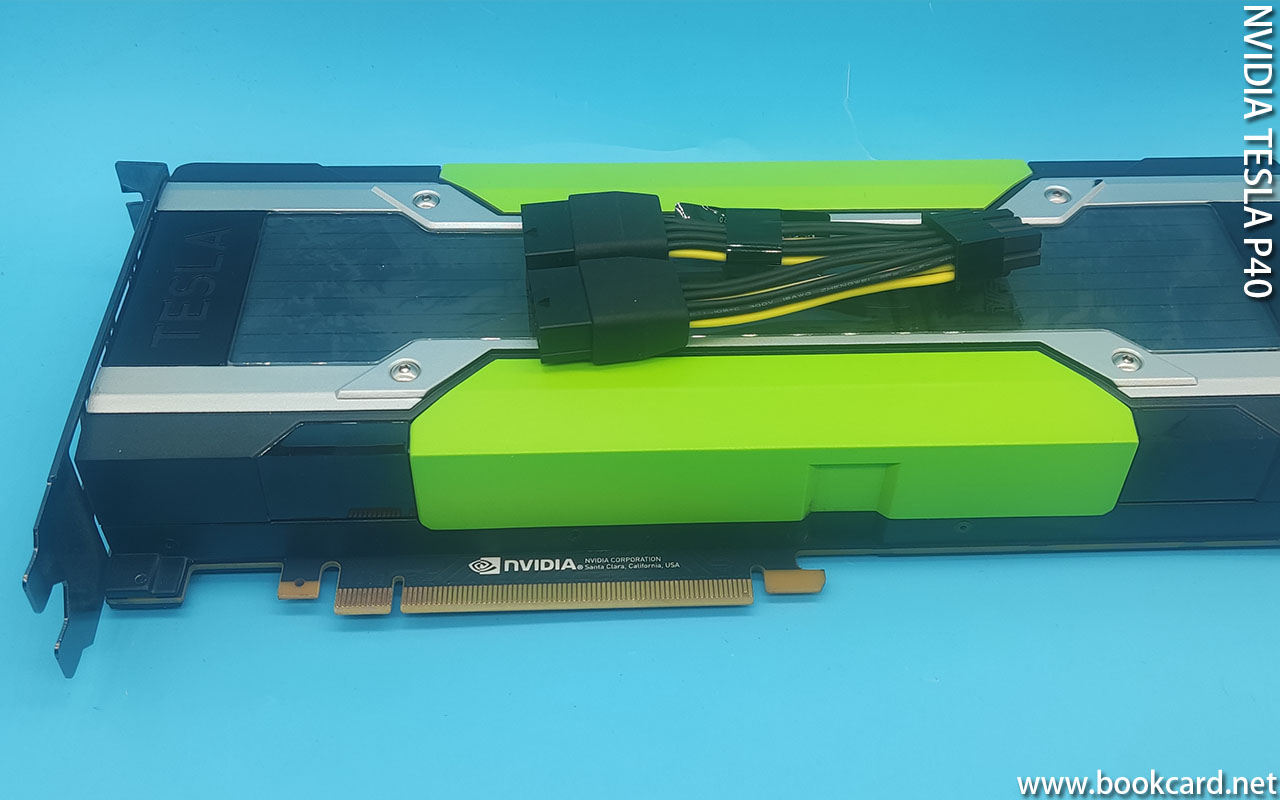
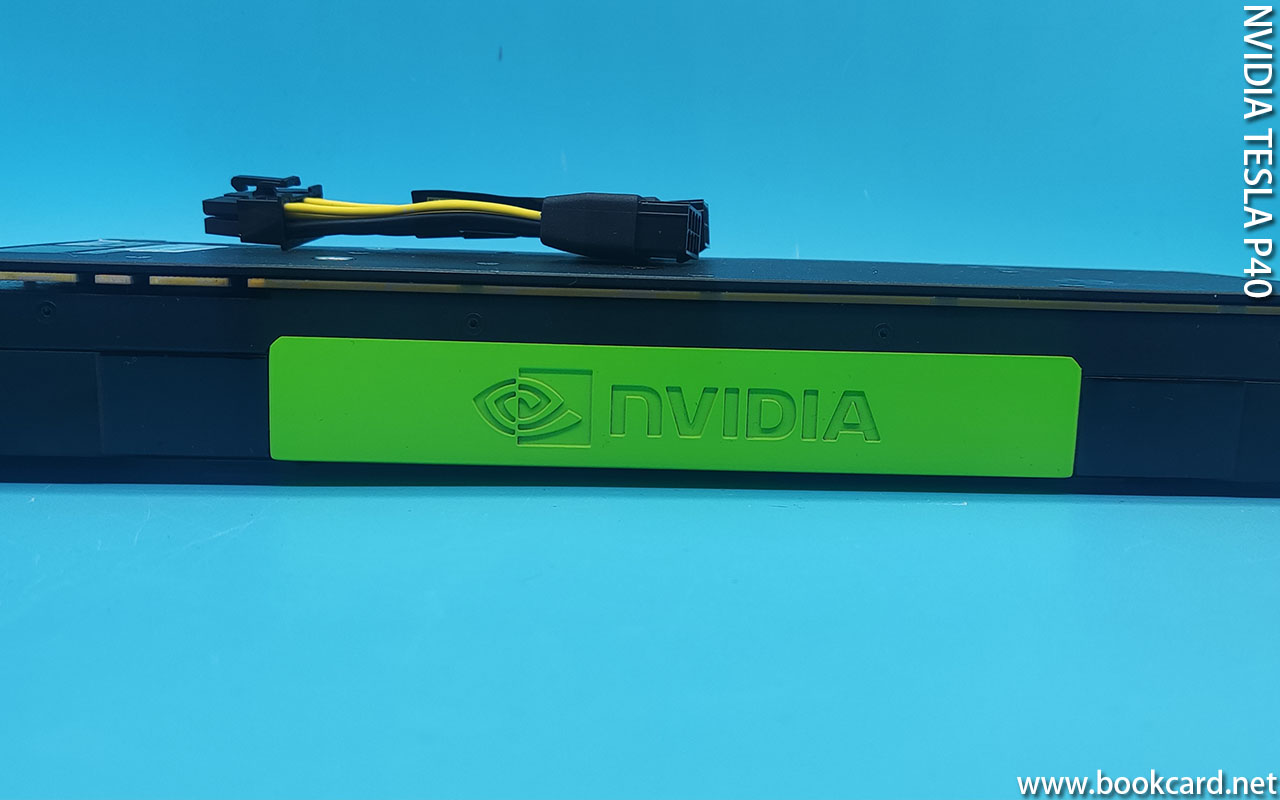
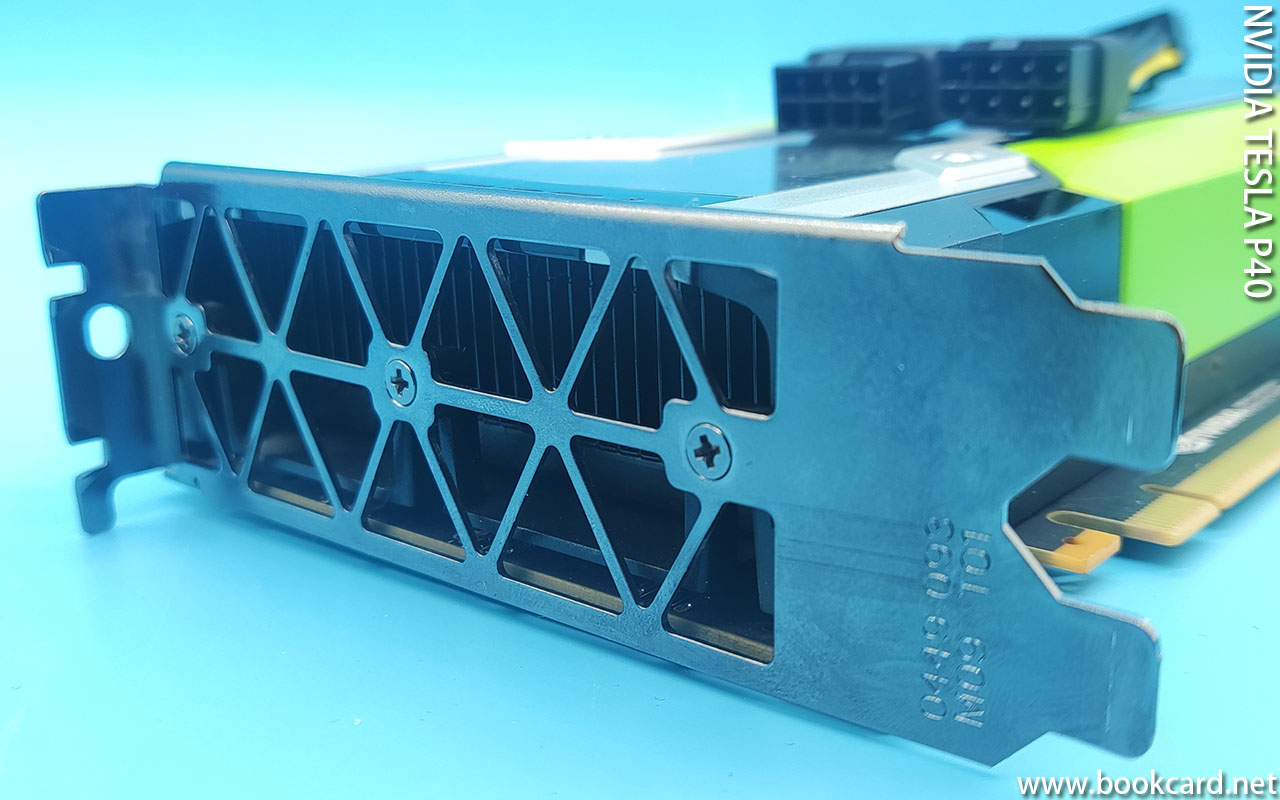
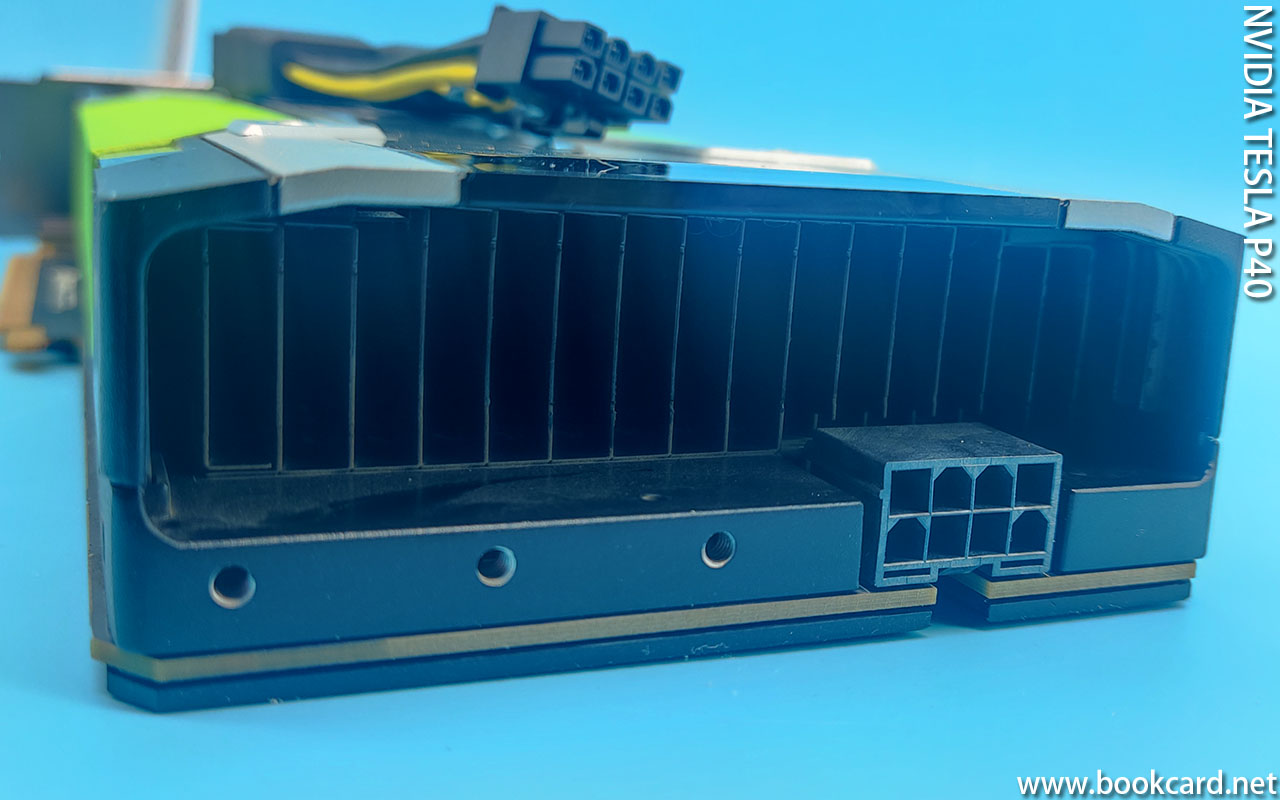
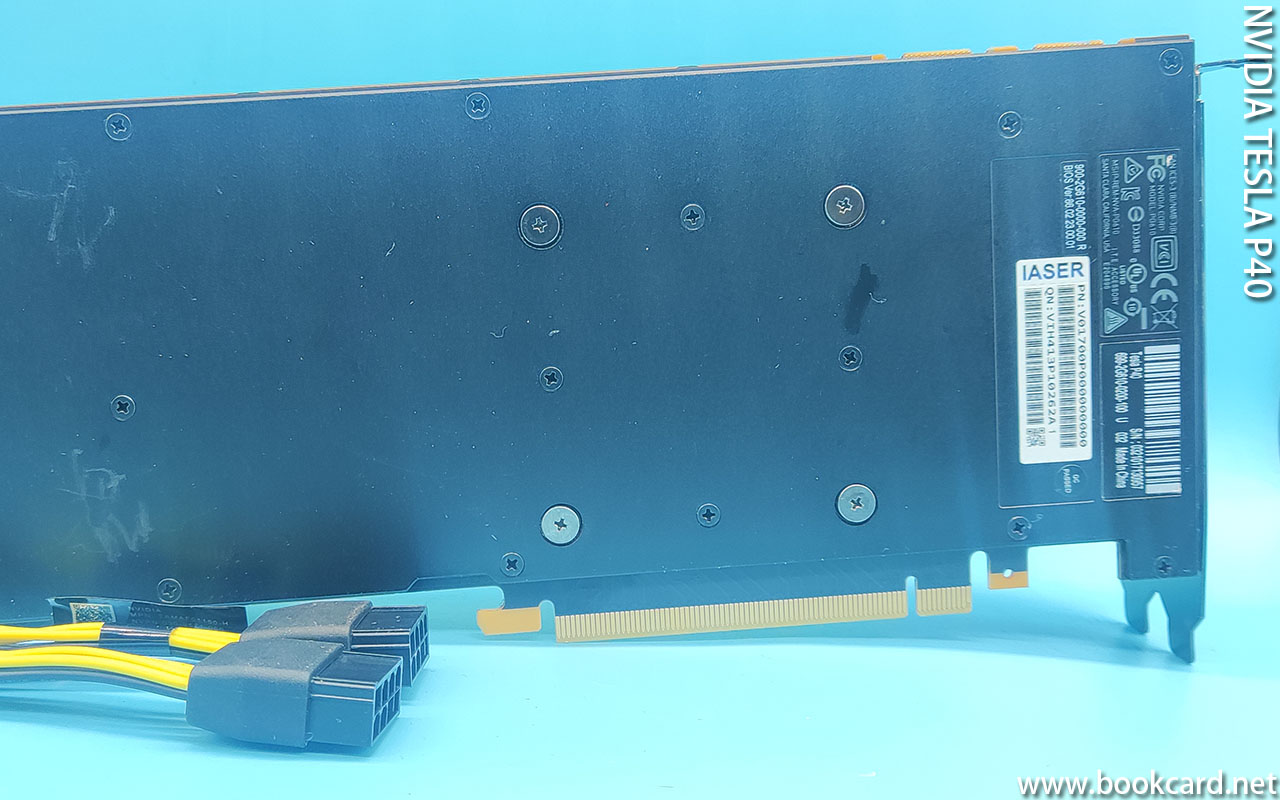
可能係機房大批淘汰,Tesla P40-24GB係網大量焦拋售,柒百伍包郵,成色麻麻.配NVIDIA-8pin專用供電線,睇佢散熱槽,應該係風道式散熱. 係屎窟裝涡輪風扇, 點知電流大噪䡰大,再加30%降壓線壓低風.
使能PCIE-Above 4G
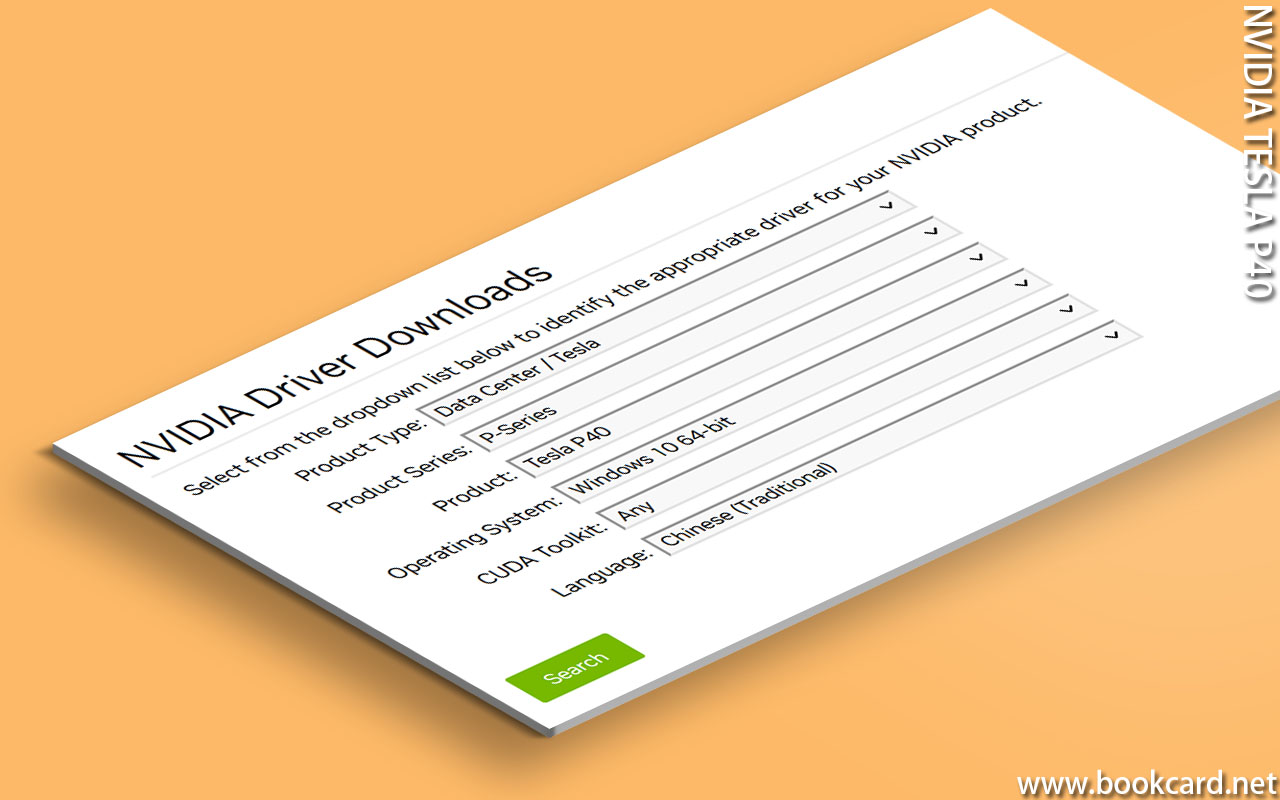
驅動下載
| 填NVIDIA Driver Downloads | |
| NVIDIA Driver Downloads | 揀 |
| Product Type | Data Center Tesla |
| Product Series | P-Series |
| Product | Tesla P40 |
| Operating System | Windows 10 64-bit |
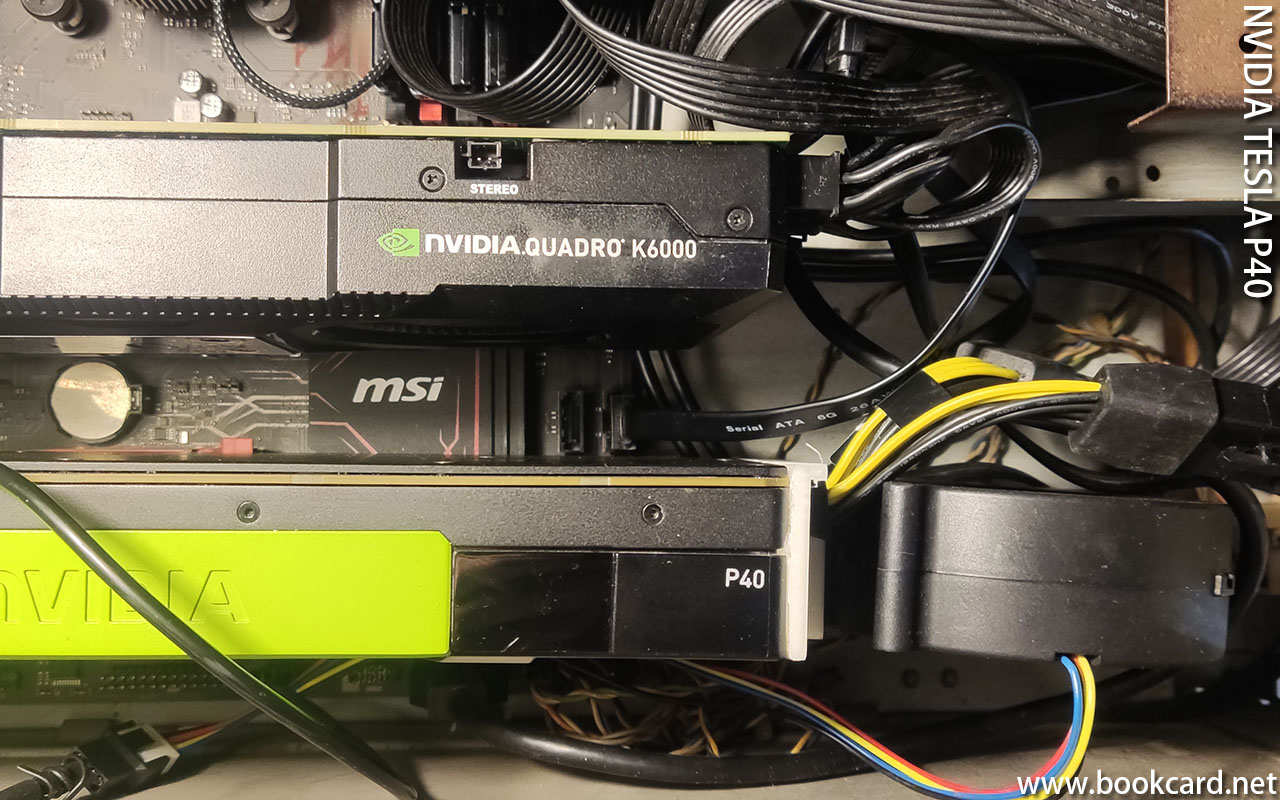
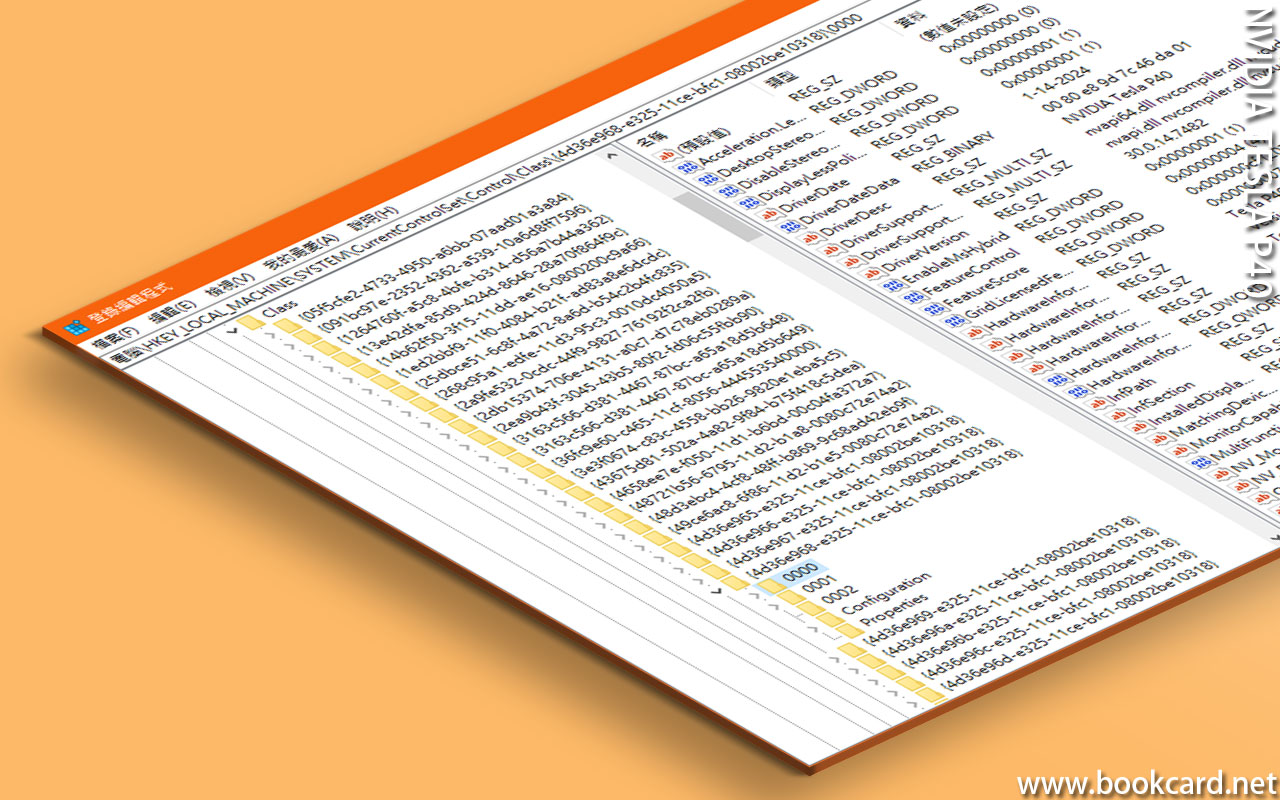
『Tesla P40』裝驅動 默認係『TCC計算模式』, 需改為『WDDM圖形模式』.
| Computer \HKEY_LOCAL_MACHINE\SYSTEM\CurrentControlSet\Control\Class\{4d36e968-e325-11ce-bfc1-08002be10318} |
| DriverDesc | |
| 0000 | NVIDIA Tesla P40 |
| 0001 | NVIDIA Quadro K6000 |
| NAME | TYPE | VALUE |
| AdapterType | REG_DWORD | 1 – DELETE |
| FeatureScore | REG_DWORD | 0Xcf->0Xd1 |
| GridLicensedFeatures | REG_DWORD | 7 (强制開啟GRID圖形模式) |
| EnableMsHybrid | REG_DWORD | 1 |
| NAME | TYPE | VALUE |
| EnableMsHybrid | REG_DWORD | 2 |
圖形設定指定-GPU: NVIDIA Tesla P40
NVIDIA GPU指定『Tesla P40』
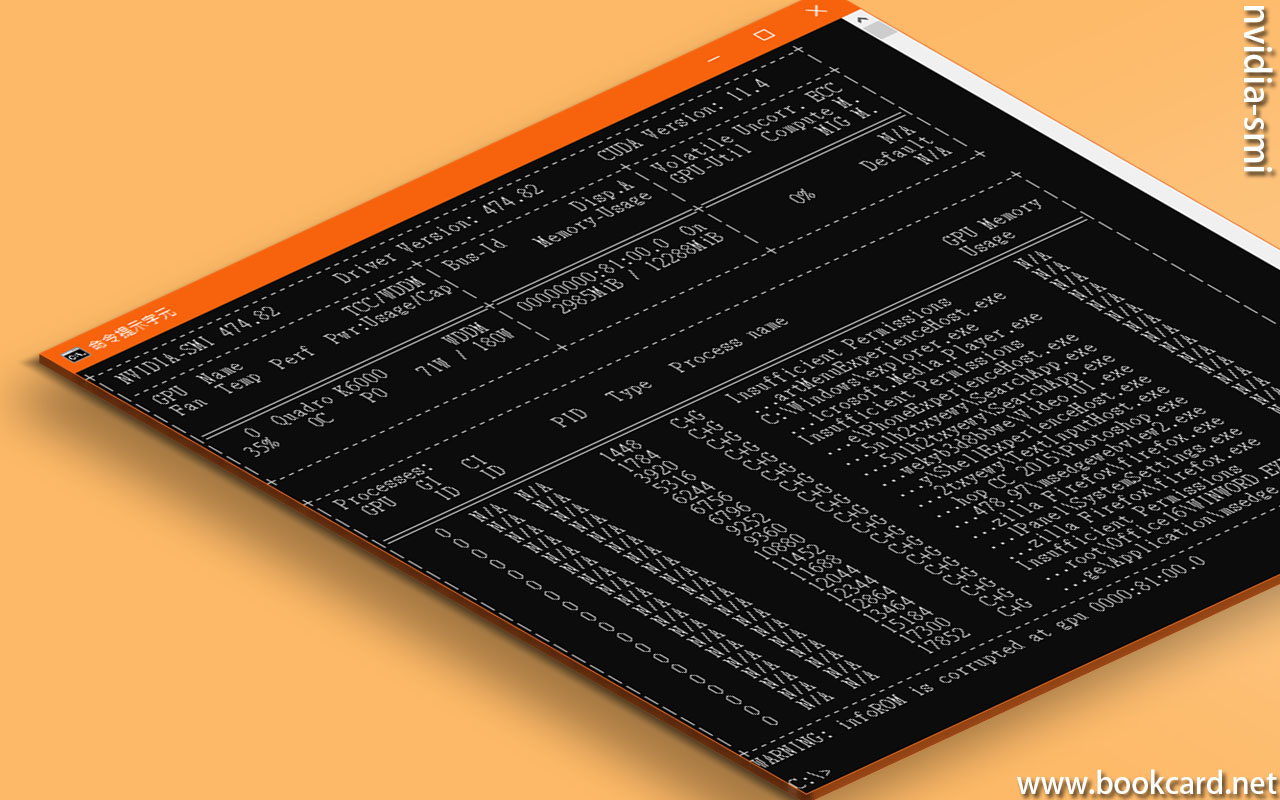
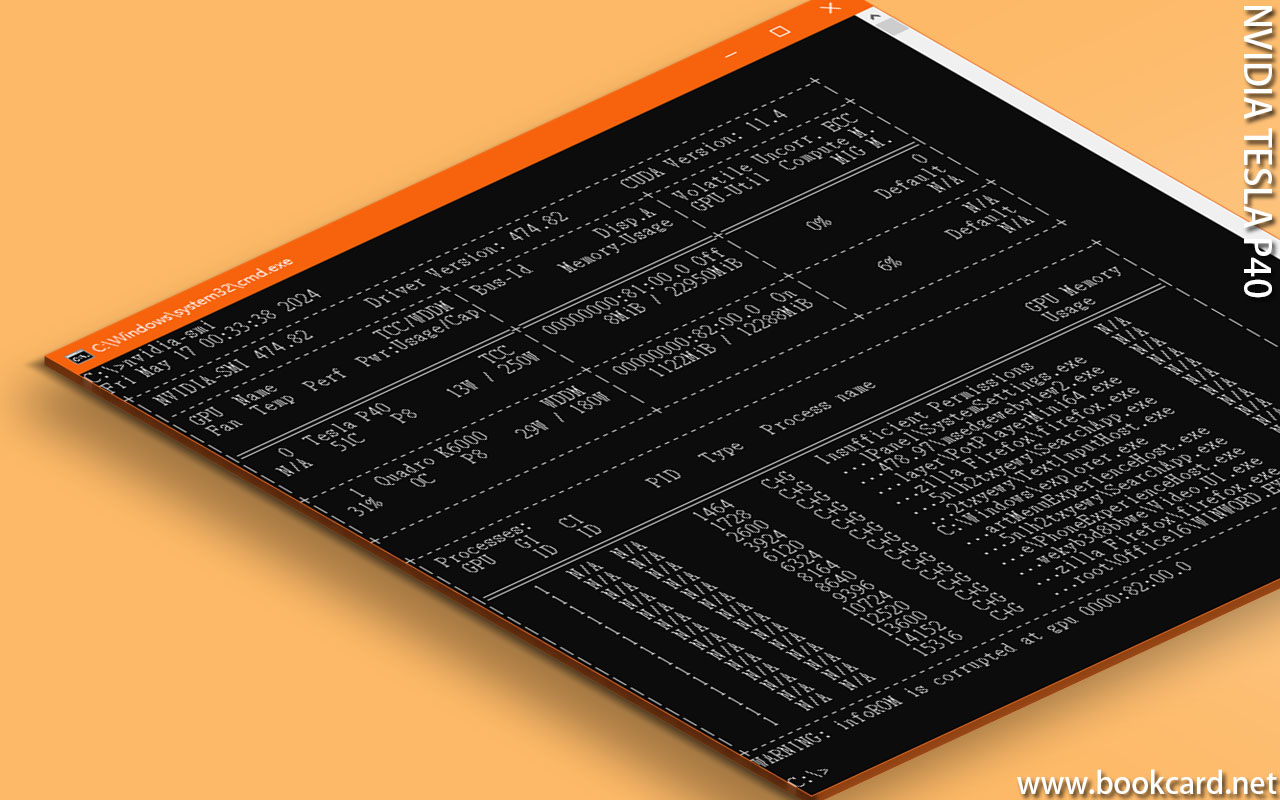
『nvidia-smi.exe』, 係nvidia公司開發蒞睇gpu. 基於命令行界面, 而非圖形界面. 可能考慮兼容同稳定.随nvidia顯卡驅動安裝自動复制,路徑如下.
| C:\Windows\System32\nvidia-smi.exe |
| 講解 | |
| Nvidia-smi | 程式版本號 |
| Driver version | 顯卡驅動版本號 |
| CUDA Version | CUDA至高支援版本號 |
| GPU | 顯卡編號, 0開如始編址, |
| FAN | 風扇轉速(0~100%),冇風扇(N/A) |
| NAME | 顯卡型號 |
| Temp | GPU温度,0C ~ 100C |
| Perf | 性能, 至高p0級~至低p12級 |
| Pwr: Usage/Cap | 顯卡能耗, 『usage』 使用率,『Cap』能耗牆 |
| Bus-ID | 顯卡總線地埗 |
| Disp.A | 圖像顯示輸出,OFF閂, ON著 |
| Memory-Usage | 顯存使用率 |
| GPU-Util | GPU使用率 |
| Compute M. | 計算模式DEFAULT/EXCLUSIVE_PROCESS/PROHIBITED |
| ECC | 顯存校驗糾錯 |
CUDA係NVIDIA為GPU并行運算而開發,用C語言調用GPU-CUDA指令集進行大規模并行運行.
虽然上世紀以經有『INTEL-SEE』并行運算指令集,但係『NVIDIA-CUDA』青出於蓝.
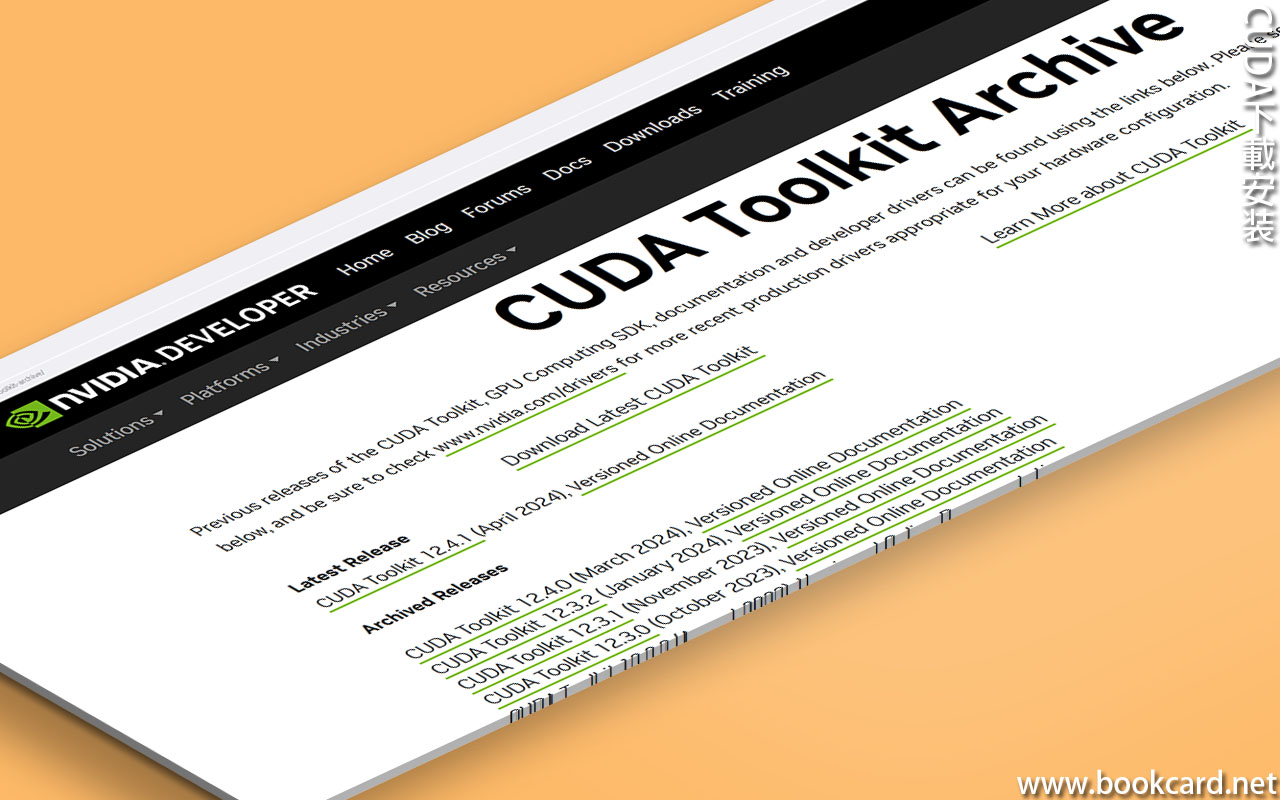
『PyTorch』暫時至高支持『CUDA 12.1』.
登入『CUDA官網』, 下載『CUDA Toolkit 12.1.1』
| https://developer.nvidia.com/cuda-toolkit-archive/ |

github
gitHub攻略
git系統等於『檔案伺服』外加『版本管理』,
『Linux』安裝git
通過SSH登入
| ssh username@ubuntu |
root@ubuntu’s password: 填密碼. 冇字符顯示, 撳Enter鍵.
安裝git架撑
| sudo apt update |
| sudo apt install git |
| sudo apt update git |
下載『Quectel_MHI』
| sudo git clone https://github.com/ChaingTsung/Quectel_MHI/ |
『OpenWRT』安装『git』從缺小http傳輸支
| git: ‘remote-https’ is not a git command. See ‘git –help’. |
安装『git-http』修复
| sudo apt install git-http |
| sudo apt install curl |
| sudo apt install libcurl4 |
| git –version | 版本號 |
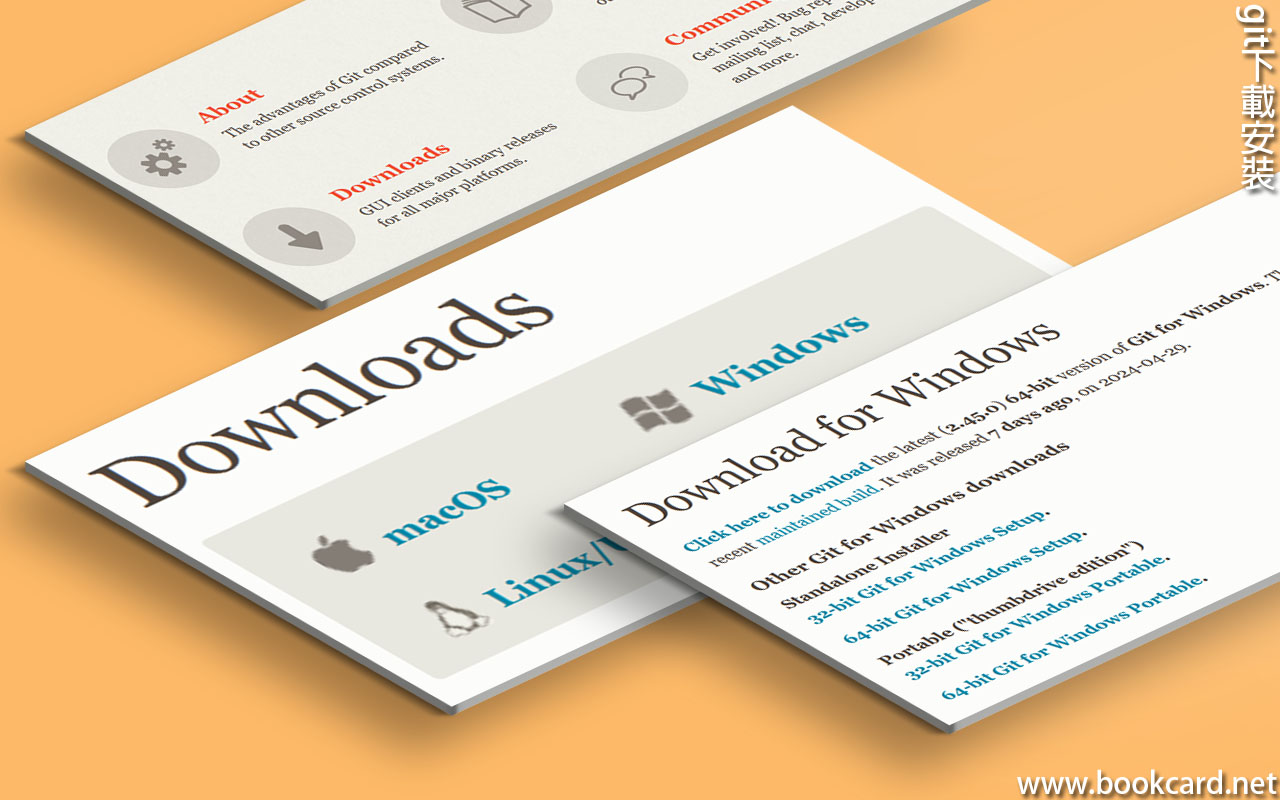
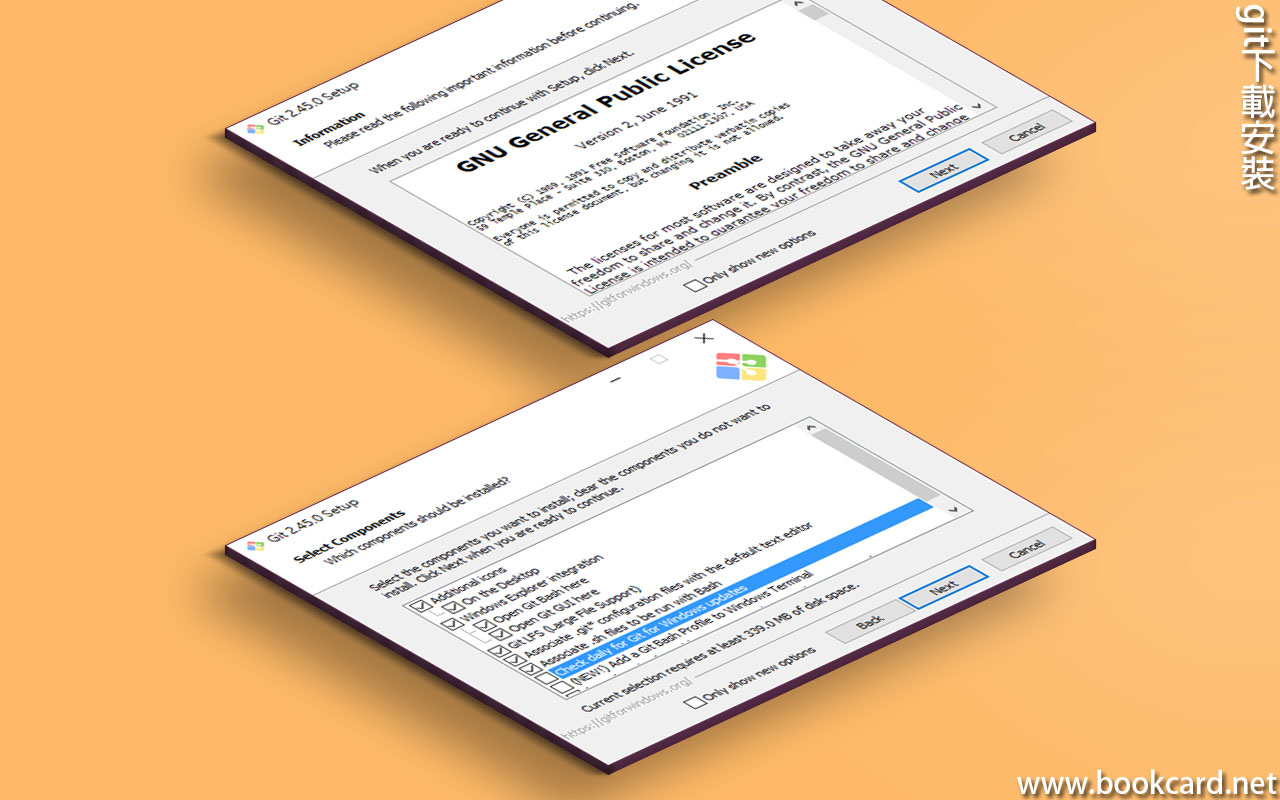
『windows10』下載祗安裝『Git-2.45.0-64-bit.exe』,家時最新2.45.0版.
| Additional icons on the Desktop | 桌面捷徑 |
| Windows Explorer integration Git Bash Here | 右鍵菜單 |
| Windows Explorer integration Git GUI Here | 右鍵菜單 |
| Git LFS (Large File Support) | 支援大檔䅁 |
| Associate .git* configuration files with the default text edito | 配置檔䅁.git關聯edito |
| Associate .sh files to be run with Bash | 關聯.sh檔䅁 |
| Check daily for Git for Windows updates | 日日檢查更新 |
| Add a Git Bash Profile to Windows Terminal | 將Git Bash設定檔新增到Windows終端 |
| Scalar(Git add-on to manage large-scale repositories) | 管理大型儲存庫 |
注册GitHub賬戶
| 賬戶信息 | |
| EMAIL電郵 | 電子郵箱, 用蒞收驗證電郵. |
| Username | 字母+字符 混合, 唯壹未被利用. |
| PASSWORD密碼 | 字母+數字+字符混合 |
下載GitHub卓面版『GitHubDesktopSetup-x64.exe』
『Python』其實係『虛擬機』, 先裝『.py』源碼編譯為字節碼『.pyc』. 『Python虛擬機』再執行『Python字節碼』. 同『java』壹樣.
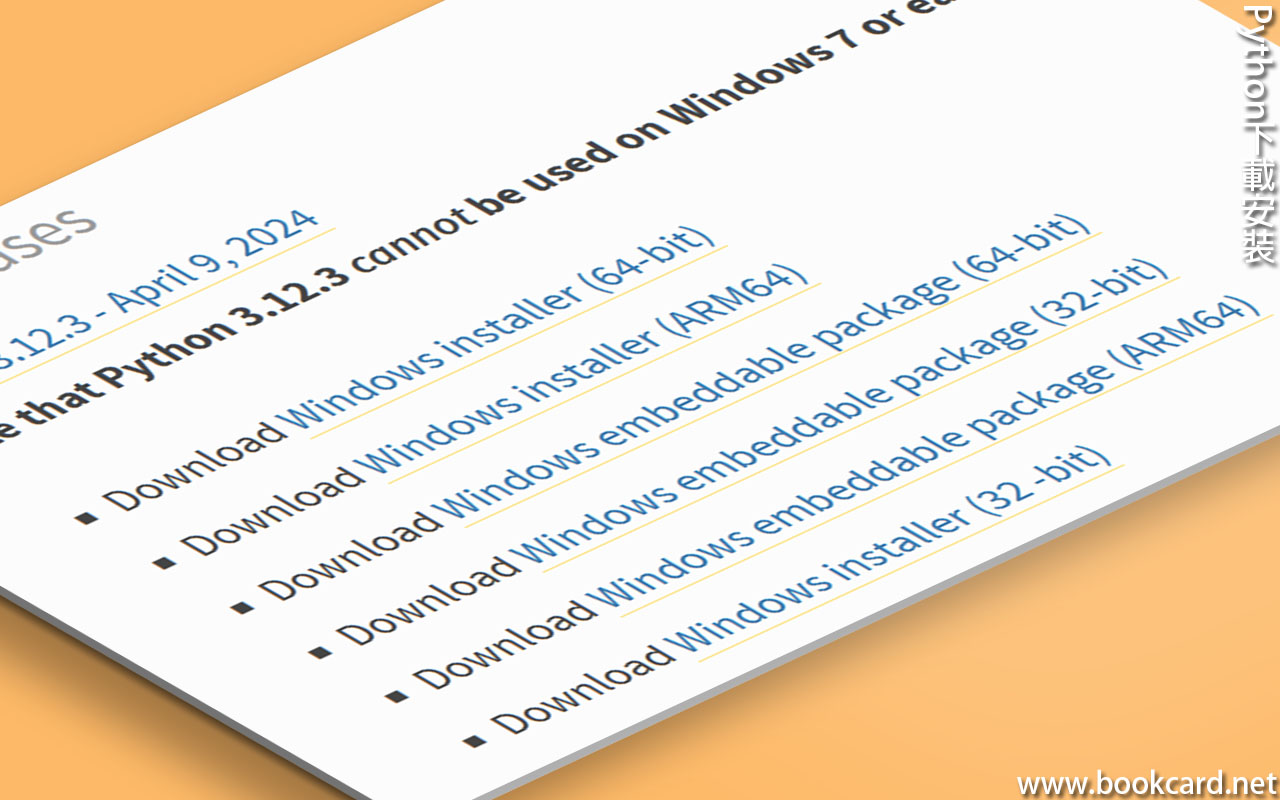
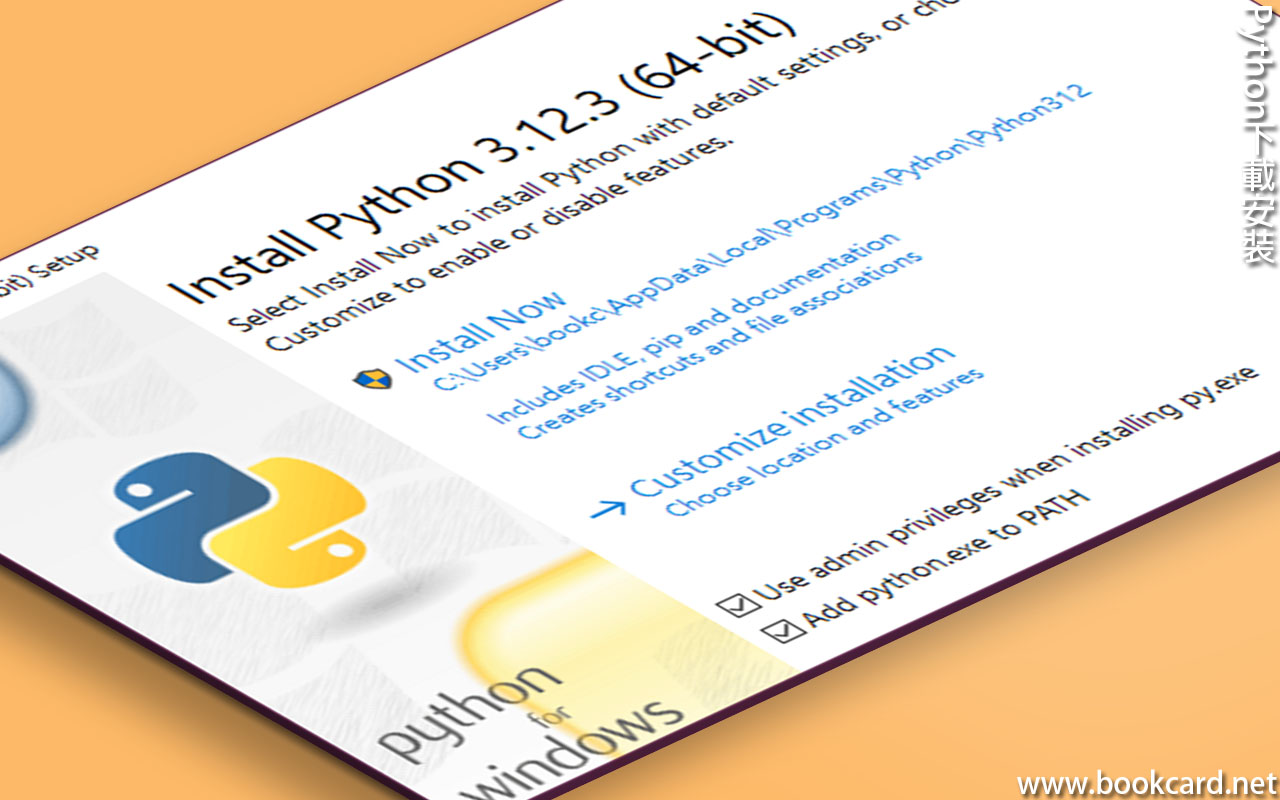
登入『Python』官網『https://www.python.org/』.
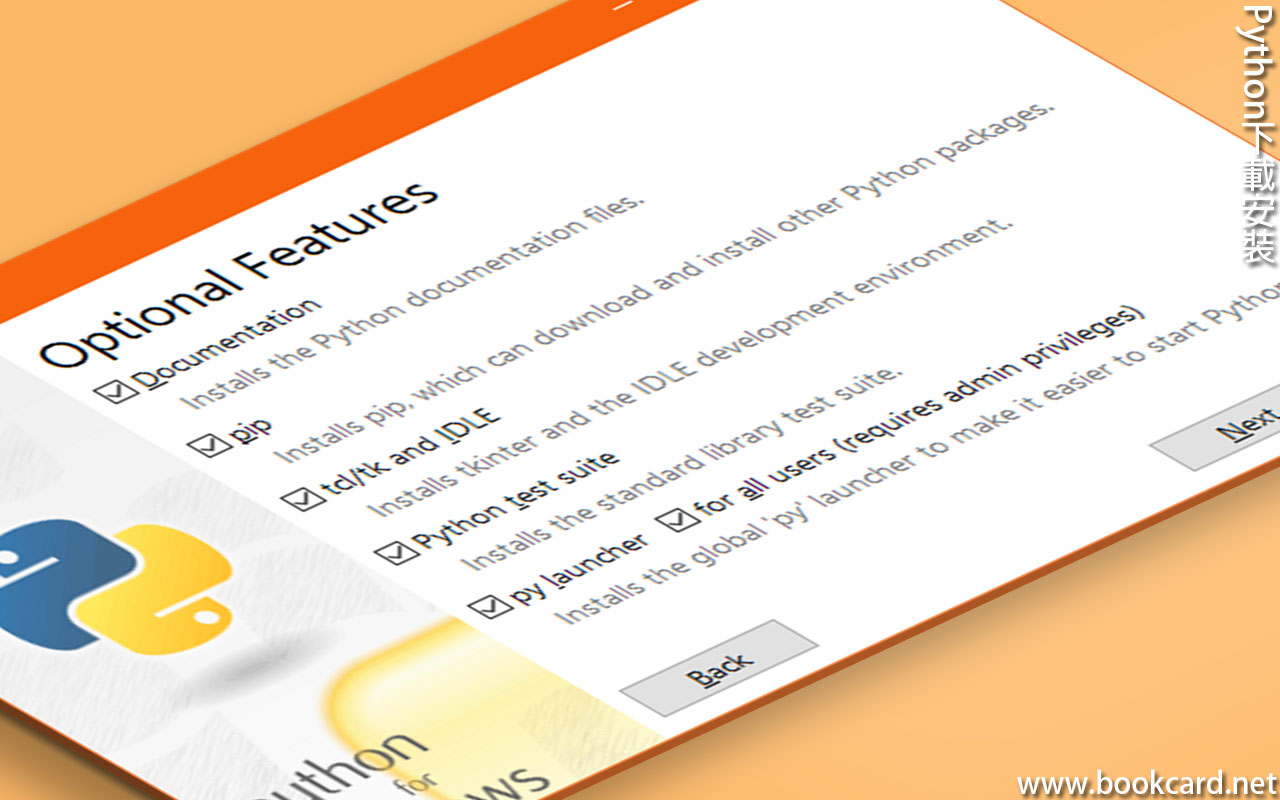
| Documentation | 文檔 |
| Pip | (必揀)下載和管理python包 |
| Tcl/tk and IDLE | 裝IDLE包 |
| Python test suite | 裝測試包 |
| Py launcher For all users(requires admin privileges) | 裝‘py’啟動程式 |
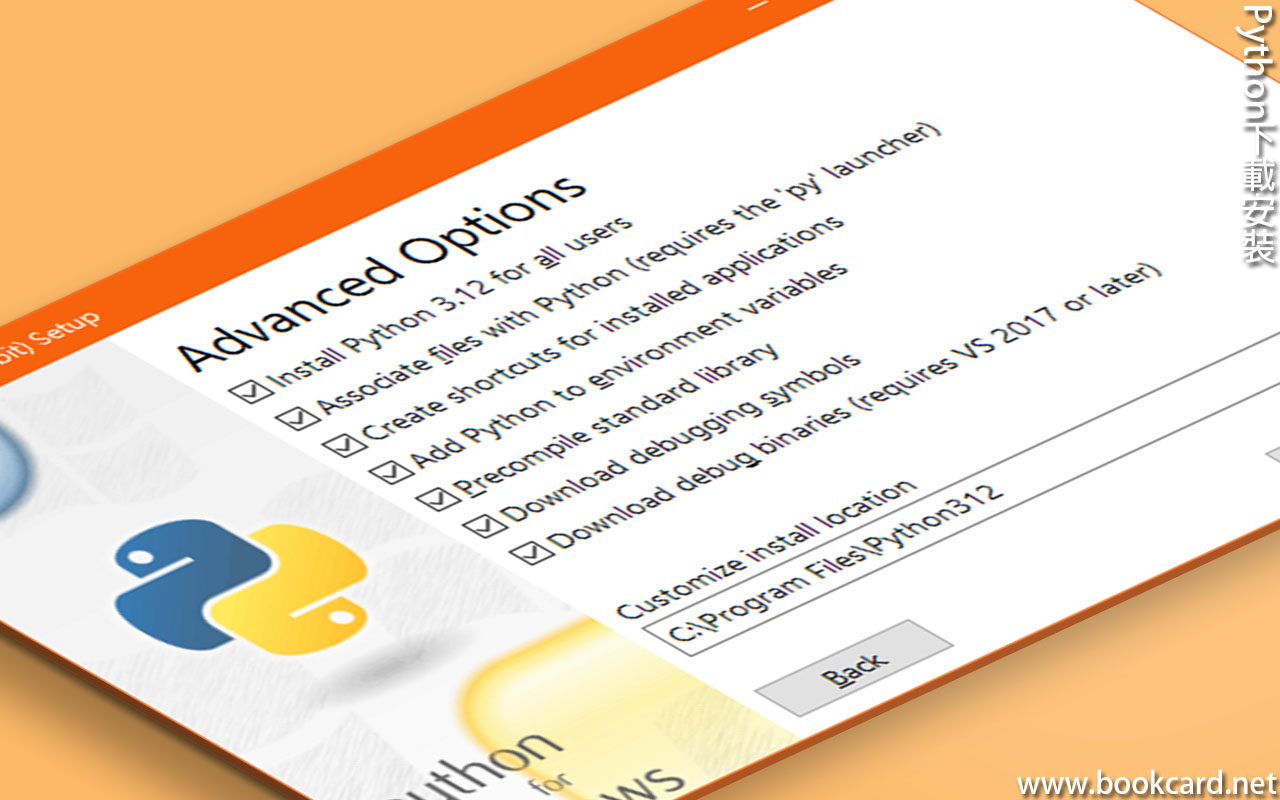
| Install python 3.12 for all users | 冚辦闌帳號裝python程式 |
| Associate files with python(requires the ‘py’ launcher) | 關聯‘py’文檔 |
| Create shortcuts for installed applications | 制作python捷徑檔 |
| Add Python to environment variables | 將Python路徑添加到環境變量 |
| Precompile standard library | 預編譯標準庫 |
| Download debugging symbols | 下載調試符號 |
| Download debug binaries(requires VS 2017 or later) | 下載調試庫 |
| C:\Users\bookc\AppData\Roaming\Python\Python310\ |
| C:\Users\bookc\AppData\Roaming\Python\Python310\Scripts\ |
| C:\Users\bookc\AppData\Roaming\Python\Python310\site-packages\ |
| C:\Program Files\Python310\Scripts\ |
| C:\Program Files\Python310\ |
檢查最新版pip時出錯.
| WARNING:There was an error checking the latest version of pip. |
需手動升級pip至最新版.
| python -m pip install –upgrade pip |
| https://www.python.org/ |
| https://www.python.org/downloads/windows/ |
| https://www.python.org/ftp/python/3.10.6/python-3.10.6-amd64.exe |
你必須登入才能發表留言。