OpenGL之讀取Targa圖檔

OpenGL之讀取Targa圖檔

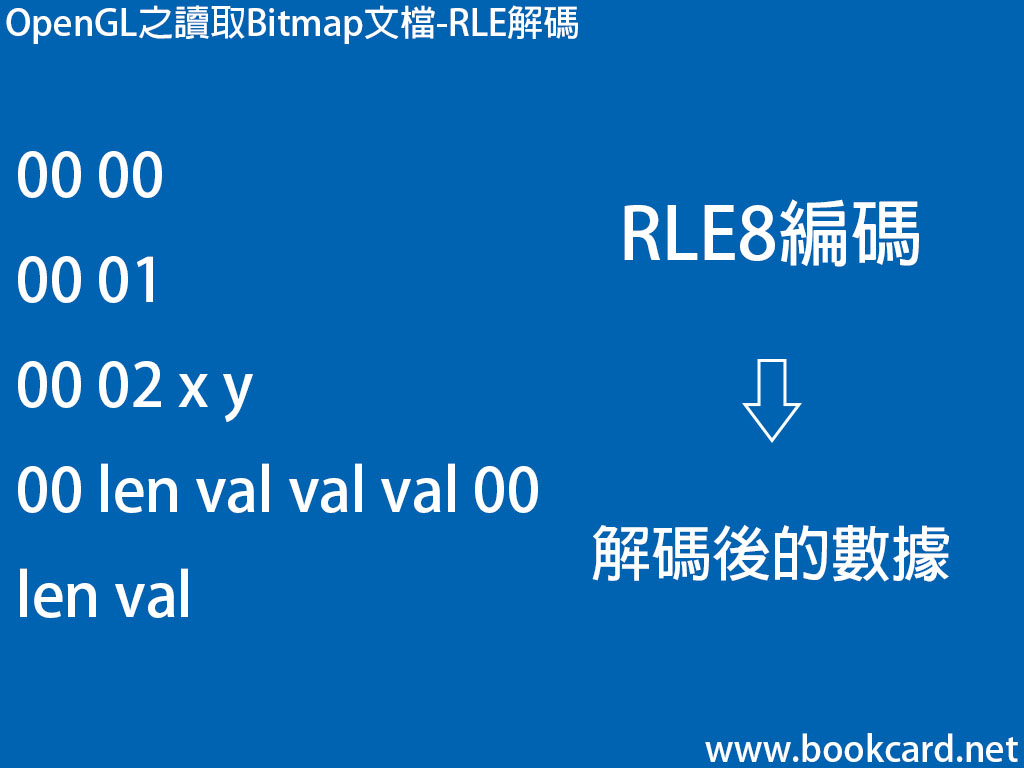
『Targa』是常用於3D紋理的『.tga』圖檔,它與『Bitmap』最大的分別是索引、RGB、灰度均支持RLE編碼,當色彩較單調時壓縮效果明顯. 渲染演示程式下載:

它的文檔結構主要由三部份組成:

Targa圖檔結構 簡介
HEADER header; 頭部
PALETTEENTRY palette[256]; 調色板常用於256色模式,灰度模式和RGB模式均無調色板
PBYTE buffer; 位圖數據


頭部結構 簡介
BYTE imageIDLength; 圖像頭部的長度
BYTE colorMayType 調色板類型

0=無

1=使用調色盤

BYTE imageTypeCode 圖像類型

0=無圖像數據

1=索引模式

2= RGB模式

3=灰度模式

9=RLE壓縮索引模式

10=RLE壓縮RGB模式

11=RLE壓縮灰度模式

WORD colorMapOrigin 調色板偏移量
WORD colorMapLength 調色板的長度8bit圖檔這個值為256
BYTE colorMapEntrySize 調色板單個條目的大細

有本書居然寫錯左所占空間大細暈

WORD imageXOrigin 圖像左下角的X軸座標總為0
WORD imageYOrigin 圖像左下角的Y軸座標總為0
WORD imageWidth 圖寬
WORD imageHeight 圖高
BYTE bitCount 像素8BIT,16BIT,24BIT,32BIT
BYTE imageDescriptor 圖像原點的位置


調色板結構 簡介
BYTE red; 紅色
BYTE green; 綠色
BYTE blue; 藍色


載入並分釋TARGA圖檔

bool Load_Targa(TARGA_FILE_PTR targa, PBYTE data,int size)

{

int index;

PBYTE image;

int   image_size;// 圖像字節的長度

int   pixel_size;// 像素大小

int   pixel_count;// 像素個數(寬*高)

memcpy(&targa->header, data, sizeof(TARGA_HEADER));// 讀取頭部數據

image_size = targa->header.imageWidth * targa->header.imageHeight * targa->header.bitCount / 8;

pixel_size = targa->header.bitCount / 8;

pixel_count = targa->header.imageWidth * targa->header.imageHeight;

targa->buffer = (PBYTE)malloc(image_size);// 根據位圖影像的大小申請空間

if (targa->buffer == NULL)

return false;//出錯返回

if (targa->header.imageTypeCode == TARGA_TYPE_INDEXED ||

targa->header.imageTypeCode == TARGA_TYPE_INDEXED_RLE )// 壓縮索引

image = data + sizeof(TARGA_HEADER) + targa->header.imageIDLength + targa->header.colorMapOrigin + (targa->header.colorMapEntrySize / 8) * targa->header.colorMapLength;

else

image = data + sizeof(TARGA_HEADER) + targa->header.imageIDLength ;

if( targa->header.imageTypeCode == TARGA_TYPE_INDEXED ||// 索引

targa->header.imageTypeCode == TARGA_TYPE_RGB     ||// RGB

targa->header.imageTypeCode == TARGA_TYPE_GRAYSCALE)// 灰度

{   // 讀取位圖的圖像

memcpy(targa->buffer, image, image_size);

}

else

if (targa->header.imageTypeCode == TARGA_TYPE_INDEXED_RLE  ||// 壓縮索引

targa->header.imageTypeCode == TARGA_TYPE_RGB_RLE      ||// 壓縮RGB

targa->header.imageTypeCode == TARGA_TYPE_GRAYSCALE_RLE )// 壓縮灰度

{ // RLE解碼

Load_RLE_Targa(targa->buffer, image, image_size, pixel_size);

}

if (targa->header.bitCount == 8)

{   // 計算調色板的入口地址

PBYTE  palette = data + sizeof(TARGA_HEADER) + targa->header.imageIDLength + targa->header.colorMapOrigin;

// RGBQUAD結構與PALETTEENTRY結構的順序調轉了

for (index = 0; index < targa->header.colorMapLength; index++)

{//掉轉調色板的紅色和綠色

targa->palette[index].red   = palette[index *targa->header.colorMapEntrySize/8 + 2];

targa->palette[index].green = palette[index *targa->header.colorMapEntrySize/8 + 1];

targa->palette[index].blue  = palette[index *targa->header.colorMapEntrySize/8 + 0];

targa->palette[index].flags = PC_NOCOLLAPSE;

}

PBYTE temp_buffer = targa->buffer;

//根據圖像的寬高計算記憶體空間(24BIT)

targa->buffer = (UCHAR *)malloc(targa->header.imageWidth * targa->header.imageHeight * 3);

if (targa->buffer == NULL)

return false;//出錯返回

for (index = 0; index < image_size; index++)

{ // 現在將索引值轉為24位值

int color = temp_buffer[index];

if (targa->header.imageTypeCode == TARGA_TYPE_GRAYSCALE ||

targa->header.imageTypeCode == TARGA_TYPE_GRAYSCALE_RLE)

{// 處理灰度圖像

targa->buffer[index * 3 + 0] = color;

targa->buffer[index * 3 + 1] = color;

targa->buffer[index * 3 + 2] = color;

}

else

{

targa->buffer[index * 3 + 0] = targa->palette[color].red;

targa->buffer[index * 3 + 1] = targa->palette[color].green;

targa->buffer[index * 3 + 2] = targa->palette[color].blue;

}

}

targa->header.bitCount = 24;//最後將位圖位數變為24位

}

else

if (targa->header.bitCount == 16)//RGB555

{   // 根據位圖影像的大小申請空間

PBYTE temp_buffer = targa->buffer;

// 根據位圖影像的大小生請空間(位圖為16位但要生成24位空間來保存)

targa->buffer = (UCHAR *)malloc(targa->header.imageWidth * targa->header.imageHeight * 3);

if (targa->buffer == NULL)

{//分配內存空間失敗

free(temp_buffer); // 釋放資源

return false;//出錯返回

}

for (index = 0; index < pixel_count; ++index)

{

WORD color = (temp_buffer[index2 + 1] << 8) | temp_buffer[index2 + 0];

UCHAR red = (((color) >> 10) & 0x1f);

UCHAR green = (((color) >> 5) & 0x1f);

UCHAR blue = ((color) & 0x1f);

targa->buffer[index * 3 + 0] = (red << 3);

targa->buffer[index * 3 + 1] = (green << 3);

targa->buffer[index * 3 + 2] = (blue << 3);

}

targa->header.bitCount = 24;//最後將位圖位數變為24位

free(temp_buffer); // 釋放資源

}

else

if (targa->header.bitCount == 24)

{

for (index = 0; index < image_size; index = index + 3)

{

UCHAR blue = targa->buffer[index + 0];

UCHAR green = targa->buffer[index + 1];

UCHAR red = targa->buffer[index + 2];

targa->buffer[index + 0] = red ;

targa->buffer[index + 2] = blue;

}

}

else

if (targa->header.bitCount == 32)

{

for (index = 0; index < image_size; index = index + 4)

{

//DWORD color;//32的顏色

UCHAR blue = targa->buffer[index + 0];

UCHAR green = targa->buffer[index + 1];

UCHAR red = targa->buffer[index + 2];

targa->buffer[index + 0] = red;

targa->buffer[index + 2] = blue;

}

}

// 判斷圖像原點是否左下角,否則翻轉圖像

if ((targa->header.imageDescriptor & TARGA_ORIGIN_TOP_LEFT) == TARGA_ORIGIN_TOP_LEFT)

Flip_Targa(targa->buffer, targa->header.imageWidth * pixel_size, targa->header.imageHeight);

return true;//

}


將顛倒的圖像翻轉過來

image:指向位圖數據

bytes_per_line:圖像每行所占的字節數

height:圖像的高度

bool Flip_Targa(UCHAR *image, int bytes_per_line, int height)

{

UCHAR *buffer; //用於臨時保存位圖數據.

int index;     //循環計數

//根據位圖影像的大小生請空間

buffer = (UCHAR )malloc(bytes_per_lineheight);

if (buffer == NULL)

return false;

// 位圖拷貝

memcpy(buffer, image, bytes_per_line*height);

// 垂直顛倒圖片

for (index = 0; index < height; index++)

memcpy(&image[((height – 1) – index)bytes_per_line], &buffer[indexbytes_per_line], bytes_per_line);

//釋放臨時空間

free(buffer);

return true;//返回

}

OpenGL之讀取Bitmap圖檔-RLE解碼

OpenGL之讀取Bitmap圖檔-RLE解碼

『Bitmap』若是8Bit圖檔則支持RLE編碼(run length encoding),但網絡上大多解釋器都不支持RLE解碼,實現它非常間單,但若顏色較多很可能壓縮後的尺寸比不壓縮之前還要大. Bitmap文檔的『compression』等於1則使用RLE8編碼: 渲染演示程式下載:

數值 簡介
00 00 本行結尾,座標移至下一行頭部
00 01 位圖結束完成解碼
00 02 x y 第三第四字節分別當前位置的X與Y偏移量
00 len val val val 00 非壓縮不重複數據,此數值長度要以2對齊,不足以0補齊

若數值為:00 03 BB CC DD 00

則解壓後:BB CC DD

len val 壓縮的重複數據

若數值為:04 88

則解壓後:88 88 88 88

BMP-8Bit模式的RLE解碼

image:輸出

data:輸入RLE圖像數據

data_size:RLE圖像數據長度

void Load_RLE8_Bitmap(PBYTE image, PBYTE data, int data_size, int width)

{

BYTE value;

BYTE length;// 像素個數

int image_index = 0;

int data_index = 0;

int x = 0;

int y = 0;

while (data_index < data_size)// 遍歷壓縮後數據

{

if (data[data_index] == 0 && data[data_index + 1] == 0)

{// 本行結尾

data_index = data_index + 2;

x = 0;

++y;

}

else

if (data[data_index] == 0 && data[data_index + 1] == 1)

{// 位圖結尾

data_index = data_index + 2;

return ;

}

else

if (data[data_index] == 0 && data[data_index + 1] == 2)

{// 當前位置的偏移

x = x + data[data_index + 2];

y = y + data[data_index + 3];

data_index = data_index + 4;

}

else

if (data[data_index] == 0)

{// 非壓縮不重複數據

length = data[data_index+1];

image_index = y * width + x;

memcpy(image + image_index, data+data_index+2, length);

x = x + length;

data_index = data_index + length + 2 + length%2;

}

else

if(data[data_index] > 0)

{// 壓縮的重複數據

length = data[data_index];

value = data[data_index + 1];

image_index = y * width + x;

memset(image + image_index, value, length);

x = x + length;

data_index = data_index + 2;// 重複的像素

}

}

}

OpenGL之讀取Bitmap圖檔

OpenGL之讀取Bitmap圖檔

『Bitmap』圖檔之副檔名使用『.bmp』它非常簡單易讀,記得在2005年學DirextX時寫圖檔分析器就是它.缺點不支持壓縮.8Bit(256色)支持RLF壓縮但只有色彩單調時才有效果否則文檔更大. 不要以為256色已經淘汰,通過更換調色板的顏色可以快速更換顏色依然大有用處.渲染演示程式下載:

BMP文檔由四部分組成:

『Bitmap』文檔結構 簡介
FILE_HEADER    file; 圖檔的頭部
INFO_HEADER   info; 圖檔的信息
PALETTEENTRY  palette[256]; 調色板只用於256色.

16Bit、24Bit、32Bit均無調色板

PBYTE         buffer; 圖像數據

要在OpenGL中渲染像素『Pixel』要倒轉排成RGB/RGBA順序


FILE_HEADER文檔結構 簡介
WORD  type; ‘MB’ 0x4d42 BMP文檔標記

用於判斷是否BMP文檔

DWORD size; 文檔大小,判斷文檔是否完整
WORD  reserved1; 保留
WORD  reserved2; 保留
DWORD OffBits; 圖像數據的偏移量(文檔的頭部)


INFO_HEADER圖檔信息頭部 簡介
DWORD size; 圖檔信息頭部的大小
LONG  width; 圖檔寬度像素『Pixel』
LONG  height; 圖檔高度像素『Pixel』
WORD  planes; 平面量,總為1
WORD  bitCount; 位圖像素尺寸:

8Bit(256色)支持RLF壓縮

16BIT(分為RGB555與RGB565), 24BIT, 32BIT

DWORD compression; 壓縮類型:

0 = RGB

0 = RGB555 0x0RRRRRGGGGGBBBBB

3 = RGB565 0xRRRRRGGGGGGBBBBB

1 = RLE8 (run length encoding)壓縮

2 = RLE4

DWORD sizeImage; 圖檔數據所占空間,若使用RLE壓縮為壓縮後的大細
LONG  XPelsPerMeter; X軸每米像素
LONG  YPelsPerMeter; Y軸每米像素
DWORD ClrUsed; 圖像顏色量
DWORD ClrImportant; 圖像重要顏色量


PALETTEENTRY調色板 簡介
BYTE red; 紅色
BYTE green; 綠色
BYTE blue; 藍色
BYTE flags 只用於DirectDraw

PC_EXPLICIT:映射到硬件

PC_NOCOLLAPSE:不要映射

PC_RESERVED:保留


載入BMP位圖C代碼

bool Load_Bitmap(BITMAP_FILE_PTR bitmap,PBYTE data,int size)

{

int index;

int line_size;// 圖像每行所占的字節數

int pixel_size ;// 像素大小

PBYTE image;

int width ;// 圖寬

int height;// 圖高

// 讀取頭部數據

memcpy(&bitmap->header, data, sizeof(BITMAP_FILE_HEADER));

// 判斷是否是位圖文件

if (bitmap->header.type != BITMAP_ID)

return false;//出錯返回

// 讀取位圖信息的頭部

memcpy(&bitmap->info, data + sizeof(BITMAP_FILE_HEADER), sizeof(BITMAP_INFO_HEADER));

if (bitmap->info.sizeImage == 0)

{

bitmap->info.sizeImage = size – sizeof(BITMAP_FILE_HEADER) – sizeof(BITMAP_INFO_HEADER);

if (bitmap->info.bitCount == 8)

bitmap->info.sizeImage = bitmap->info.sizeImage – MAX_COLORS_PALETTE * sizeof(BITMAP_PALETTEENTRY);

}

//定位圖像數據

image = data + size – (int)bitmap->info.sizeImage;// 相對於文件尾

line_size = bitmap->info.sizeImage / bitmap->info.height;// 圖像每行所占的字節數

pixel_size = bitmap->info.bitCount / 8;// 像素大小

width = bitmap->info.width;// 圖寬

height = abs(bitmap->info.height);// 圖高

// 讀取位圖8或16,32位圖

if (bitmap->info.bitCount == 8)

{   // 讀取位圖的調色板

PBYTE palette = data + sizeof(BITMAP_FILE_HEADER) + sizeof(BITMAP_INFO_HEADER);

// RGBQUAD結構與PALETTEENTRY結構的順序調轉了

for (index = 0; index < MAX_COLORS_PALETTE; index++)

{//掉轉紅色和綠色

bitmap->palette[index].red   = palette[index * 4 + 2];

bitmap->palette[index].green = palette[index * 4 + 1];

bitmap->palette[index].blue  = palette[index * 4 + 0];

bitmap->palette[index].flags = PC_NOCOLLAPSE;

}

//根據位圖影像的大小生請空間

bitmap->buffer = (UCHAR *)malloc(abs(bitmap->info.width * bitmap->info.height * 3));

if (bitmap->buffer == NULL)

return false;//出錯返回

PBYTE buffer = NULL;

if (bitmap->info.compression == BITMAP_COMPRESSION_RLE8)

{

buffer = (PBYTE)malloc(abs(bitmap->info.width * bitmap->info.height));

Load_RLE8_Bitmap(buffer, image, bitmap->info.sizeImage, bitmap->info.width);// RLE解碼

image = buffer;

}

// 現在將索引值值轉為24BIT

for (int y = 0; y < height; ++y)

{

for (int x = 0; x < width; ++x)

{

index = y * width + x;

int color = image[index];

bitmap->buffer[index * 3 + 0] = bitmap->palette[color].red;

bitmap->buffer[index * 3 + 1] = bitmap->palette[color].green;

bitmap->buffer[index * 3 + 2] = bitmap->palette[color].blue;

}

}

if (bitmap->info.compression == BITMAP_COMPRESSION_RLE8)

free(buffer);

//最後將位圖位數變為24位

bitmap->info.bitCount = 24;

}

else

if (bitmap->info.bitCount == 16)// 讀取16位圖

{  // 以24BIT分配記憶體空間

bitmap->buffer = (UCHAR *)malloc(abs(bitmap->info.width * bitmap->info.height * 3));

if (bitmap->buffer == NULL)

return false;//出錯返回

if (bitmap->info.compression == 3)

{// RGB565

for (int y = 0; y < height; ++y)

{

for (int x = 0; x < width; ++x)

{// 現在將各個16位RGB值轉為32位值

index = y * line_size + x * 2;

WORD color = (image[index + 1] << 8) | image[index + 0];

UCHAR red = ((color >> 11) & 0x1f);

UCHAR green = ((color >> 5) & 0x3f);

UCHAR blue = (color & 0x1f);

index = y * width + x;

bitmap->buffer[index * 3 + 0] = (red << 3);

bitmap->buffer[index * 3 + 1] = (green << 2);

bitmap->buffer[index * 3 + 2] = (blue << 3);

}

}

}

else

{// RGB555

for (int y = 0; y < height; ++y)

{

for (int x = 0; x < width; ++x)

{

index = y * line_size + x * 2;

WORD color = (image[index + 1] << 8) | image[index + 0];

UCHAR red = (((color) >> 10) & 0x1f);

UCHAR green = (((color) >> 5) & 0x1f);

UCHAR blue = ((color) & 0x1f);

index = y * width + x;

bitmap->buffer[index * 3 + 0] = (red << 3);

bitmap->buffer[index * 3 + 1] = (green << 3);

bitmap->buffer[index * 3 + 2] = (blue << 3);

}

}

}

//最後將位16BIT變為24BIT

bitmap->info.bitCount = 24;

}

else

if (bitmap->info.bitCount == 24)// 讀取24BIT圖檔

{   // 根據位圖影像的大小申請空間

bitmap->buffer = (UCHAR *)malloc(bitmap->info.sizeImage);

if (bitmap->buffer == NULL)// 申請內存空間失敗

return false;//出錯返回

// 讀取圖像

for (int y = 0; y < height; ++y)

{

for (int x = 0; x < width; ++x)

{// 轉換GL_RGB模式

index = y * line_size + x * 3;

bitmap->buffer[index + 0] = image[index + 2];//逐個像素地拷貝

bitmap->buffer[index + 1] = image[index + 1];

bitmap->buffer[index + 2] = image[index + 0];

}

}

}

else

if (bitmap->info.bitCount == 32)// 處理32BIT圖檔

{       // 根據位圖影像的大小申請空間

bitmap->buffer = (UCHAR *)malloc(bitmap->info.sizeImage);

if (bitmap->buffer == NULL)//若不能申請空間

return false;//出錯退出

// 像素轉為BGRA 32Bit肯定是4字節對齊

for (index = 0; index < (int)bitmap->info.sizeImage-4; index=index+4)

{

bitmap->buffer[index + 0] = image[index + 2];//逐個像素地拷貝

bitmap->buffer[index + 1] = image[index + 1];

bitmap->buffer[index + 2] = image[index + 0];

bitmap->buffer[index + 3] = image[index + 3];

}

}

else

{

return false;//嚴重文提

}

if (bitmap->info.height < 0)// height為負時表示圖片顛倒

Flip_Bitmap(bitmap->buffer, bitmap->info.width*(bitmap->info.bitCount / 8), bitmap->info.height);

bitmap->info.height = abs(bitmap->info.height);

return true;

}


將顛倒的BMP文件翻轉過來

bool Flip_Bitmap(UCHAR *image, int bytes_per_line, int height)

{

UCHAR *buffer; //用於臨時保存位圖數據.

int index;     //循環計數

//分配單行空間

buffer = (UCHAR )malloc(bytes_per_lineheight);

if (buffer == NULL)

return false;

// 單行拷貝

memcpy(buffer, image, bytes_per_line*height);

// 垂直顛倒圖片

for (index = 0; index < height; index++)

memcpy(&image[((height – 1) – index)bytes_per_line], &buffer[indexbytes_per_line], bytes_per_line);

//釋放空間

free(buffer);

return true;//返回

}

OpenGL之繪畫圖像文檔

OpenGL之繪畫圖像文檔

在屏幕上渲染圖檔與模型貼上紋理總會令人興奮,幸好在OpengGL繪畫圖像文檔也並不困難,並且實現左示例程式.下載:

  1. 載入並解釋圖像文檔如『.bmp』『.tga』『.pcx
  2. 設置圖像左下角繪畫在屏幕位置glRasterPos2f(x, y);
  3. 設置圖像的縮放比glPixelZoom(xfactor,yfactor);縮放因子=屏幕尺寸/圖像尺寸
  4. 繪畫圖像glDrawPixels(width,height,format,type,pixels);與『DirectDraw』相比稍複雜點, 『DirectDraw』支持32Bit、16Bit、256色.而OpenGL卻直接支持32Bit、24Bit、256色、但要將像素『Pixel』倒轉排成RGB/RGBA順序
Format 簡介
GL_RGB 24Bit
GL_RGBA 32Bit
GL_COLOR_INDEX 調色板索引


type 簡介
GL_UNSIGNED_BYTE 像素『Pixel』分量的尺寸
GL_BITMAP 點陣位圖1位『Bit』1像素『Pixel』


常見圖檔格式讀取與分析 RLE解碼
Bitmap文檔 8Bit的bitmap支持RLE編碼
Targa圖檔 索引模式、RGB模式、灰度模式均支持RLE編碼
PCX圖檔 8Bit的PCX支持RLE編碼
PNG圖檔


渲染位圖C代碼演示:

  1. glPixelStorei(GL_UNPACK_ALIGNMENT, 4);// 4字節對齊
  2. glRasterPos2f(x, y);// 設定圖像左下角在屏幕的位置
  3. glPixelZoom((float)screen_width/(float)image_width, (float)screen_height / (float)image_height); // 設置全屏縮放
  4. glDrawPixels(image_width,image_height,format,type,image); // 繪畫

Windows之ALT快捷鍵

Windows之ALT快捷鍵

之前一值無法使用ALT鍵,因查找唔到其VK_ALT對應的『VIRTUAL CODE』,近日把WinXP切底拋棄改用Win10,發現很多程式均使用ALT鍵展示或隱藏MENU. 細想VK_ALT即等於VK_MENU,下面是使用ALT鍵展示與隱藏MENU源代碼

1.在resource.h加入

#define IDALT                           1000

2.在resource.rc加入加速表,一定要加入ALT否則MENU會獲得焦點要按量下ALT鍵,另不要用VK_LMENU和VK_RMENU

ACCEL ACCELERATORS

BEGIN

VK_MENU,        IDALT,                  VIRTKEY, ALT, NOINVERT

END

3.在main()修改消息循環

MSG msg;//消息 msg是WINDOWS放置下一個消息的存儲器,

HACCEL hAccel; // 加速鍵表的句柄

hAccel =::LoadAccelerators(main_instance,”ACCEL”); // 加速鍵表的句柄

while(GetMessage(&msg,NULL,0,0)) //從事件對列中獲得消息

{  //由 PostQuitMessage(0) 發送的WM_QUIT消息,被PeekMessage()檢測到

if(msg.message == WM_QUIT)

break;// 跳出主循環

if(!::TranslateAccelerator(main_window,hAccel,&msg))// 處理加速鍵表

{

TranslateMessage(&msg);//處理和轉換加速鍵.

DispatchMessage(&msg);//調用WinProc對消息進行處理,從MSG結構取的參數並傳遞.

}

}

4.在WinProc加入

if(msg == WM_COMMAND)

{ // 處理菜單命令

if (LOWORD(wParam) == IDALT)

{     main_menu = ::LoadMenuA(NULL,”MAIN_MENU”);// 主菜單

if (::GetMenu(main_window) == NULL)

::SetMenu(main_window, main_menu);// 設定菜單

else

::SetMenu(main_window, NULL);// 設定菜單

}

}

Visual Studio 2017新增C專案

Visual Studio 2017新增C專案

近日終於遠離最愛的VC6安裝VC2017,新增專案時居然無發現C/C++的選項,暈難道C已被拋棄?經一番鑽然才悟個中方法

  1. 運行Visual Studio 2017
  2. 『檔案/新增/專案』打開
  3. 『新增檔案/Visual C++/空白專案』
  4. 若無梯見請點按『開啟Visual Studio安裝程式』把與C++有關全部安裝
  5. 『名稱填』這裡填『OpenGL』
  6. 『位置填』這裡填『D:\C\』
  7. 取消勾選『為方案建目錄』單級目錄結構與VC6相若
  8. 按『確認』製作專案
  9. 右鍵點擊『OpenGL』打開屬性頁
  10. 打開『屬性頁/組態屬性/一般/字元集選則『使用Unicode字元集』.若選『使用多位元組字元集』則使用ANSI
  11. 打開『屬性頁/組態屬性/連接器/系統/子系統選則『Windows(/SUBSYSTEM:WINDOWS)』圖形界面。若選『主控台(/SUBSYSTEM:CONSOLE)』則為命令行界面
  12. 右鍵點擊『OpenGL』點擊『加入/新的篩選條件』填main
  13. 右鍵點擊『main』點擊『加入/新的篩選條件』
  14. 『名稱』填『main.c』副檔名為.c則使用C編譯器, 副檔名為.cpp則使用C++編譯器


OpenGL之點陣字體

OpenGL之點陣字體

在OpenGL輸出文字可用繪畫好的文本位圖,再繪畫上屏幕.也是遊戲製作通用手法.將基本ASCII文本存為16Bit*16Bit(32Byte)二進制點陣字體

指定位圖的繪畫位置

void glRasterPos2i(GLint x, GLint y);

繪畫位圖

void WINAPI glBitmap(

GLSizei width,         GLSizei height, ASCII文本的寬和高這裡均為16

GLfloat xorig,         GLfloat yorig,當前繪畫位置的偏移

GLfloat xmove,         GLfloat ymove, 下次繪畫位置的增量

const GLubyte *bitmap); 二進制點陣字體

以位畫字符B的函式為例:

  1. const unsigned char BITMAPFONT_B[] //16Bit * 16Bit 點陣字體={ 0x00,0x00,0x00,0x00,0x00,0x00,0x00,0x00,0xFC,0x00,0x66,0x00,0x66,0x00,0x66,0x00, 0x66,0x00,0x7C,0x00,0x66,0x00,0x66,0x00,0x66,0x00,0xFC,0x00,0x00,0x00,0x00,0x00};
  2. glPixelStorei(GL_UNPACK_ALIGNMENT, 1);// 對齊像素字節
  3. glColor3f(1.0f, 1.0f, 1.0f);// 顏色
  4. glRasterPos2i(x, y);// 設定位圖的位置
  5. glBitmap(16, 16, 0, 0, 16, 0, BITMAPFONT_B);// 渲染字符B

點陣字體的程序示例:下載

  1. 把輸入法設為英文
  2. 通過WM_CHAR接收ASCII碼並在屏幕繪畫
  3. 在遊戲設計中此方法也適用漢字渲染,只要把漢字轉換為點陣字體

Windows10之切底禁用Update Assistant

Windows10之切底禁用Update Assistant

『Windows10 Update Assistant』又稱為『Windows 10 更新小幫手』會自動彈出下載並安裝更新.但更新後卻把我的『港版Win10』變為『台版Win10』更新時還不能保留原有程式.最煩的是經常自動彈出.即使卸載Uninstall後還是會自動安裝. 經一番研究只禁『Windows10 Update Assistant』自動彈出,而『Windows10 Update』仍在後臺自動更新系統

  1. 『檔案總管\控制台\所有控制項目\程式和功能\ Windows10 Update Assistant』按兩下進行卸載Uninstall
  2. 『檔案總管\控制台\所有控制台項目\系統管理工具\工作排程器』按兩下啟動
  3. 『工作排程器\工作排程器程式庫\Microsoft\Windows\UpdateOrchestrator』按兩下打開
  4. 分別將『UpdateAssistant』『UpdateAssistantCalendarRun』『UpdateAssistantWakeupRun』按右側『停用』鍵把狀態設為『已停用』


Windows10之徹底禁用Windows Defender

Windows10之徹底禁用Windows Defender

Windows Defender是Windows10內置免費的既時保護查找惡意程式,但它卻經常錯報誤報影響日常工作,而且暫用大量資源,需然可然暫時關閉既時保護.『設定/更新與安全性/Windows Defender/既時保護/關閉』但更新病毒資料庫後又會開啟,你需要停止系統服務

  1. WIN+R輸入並運行msc
  2. 『本機群組原則編輯器\電腦設定\系統管理範本\Windows元組\ Windows Defender』
  3. 按兩下『關閉Windows Defender防病毒軟體』
  4. 勾選『以啟用』按『確定』.Windows Defender則徹底禁用
  5. 若要啟用Windows Defender則勾選『尚未設定』

記憶體(RAM)之帶寬

記憶體(RAM)之帶寬
wmic memorychip

記憶體(RAM)容量對計算機性能起直接的影響,而另一個關鍵參數記憶體(RAM)帶寬(Bandwidth) ,帶寬越高與CPU之間交換數據更快,更有利提高計算機性能.

計算公式如下:

帶寬(Bandwidth)=工作頻率(DRAM Frequency)*位寬(DataWidth)

  公式 簡介
工作頻率Frequency 工作頻率=記憶體頻率*通道數量 相當於車速
位寬(DataWidth) SDRAM、DDR和DDR2、DDR3、DDR4的總線位寬均為64位 相當於路寬

可以通過命令行模式輸入『wmic memorychip』查看記憶體(RAM)的所有參數如上圖

ConfiguredClockSpeed DataWidth Voltage Speed TypeDetail
時鐘速度 位寬 電壓 工作頻率 記憶體容量

以DDR4-2400為例:

工作頻率:2400 MHz

位寬:64Bit=8Byte


例計算DDR4-2400記憶體(RAM)帶寬

2400MHz*64bit/8=19200 Mbyte/s=PC19200

例計算DDR400記憶體(RAM)帶寬

400MHz*64bit/8=3200Mbyte/s=PC3200