
『OpenWrt』嵌入式路郵設計Linux系統,市面大部分路郵都係用佢,提供『防火牆』『VPN』『IPv6』『WIFI』『4G/5G』.
依甫係itx臺式電腦將『OpenWrt』,要2網口一個WAN口一個LAN口.
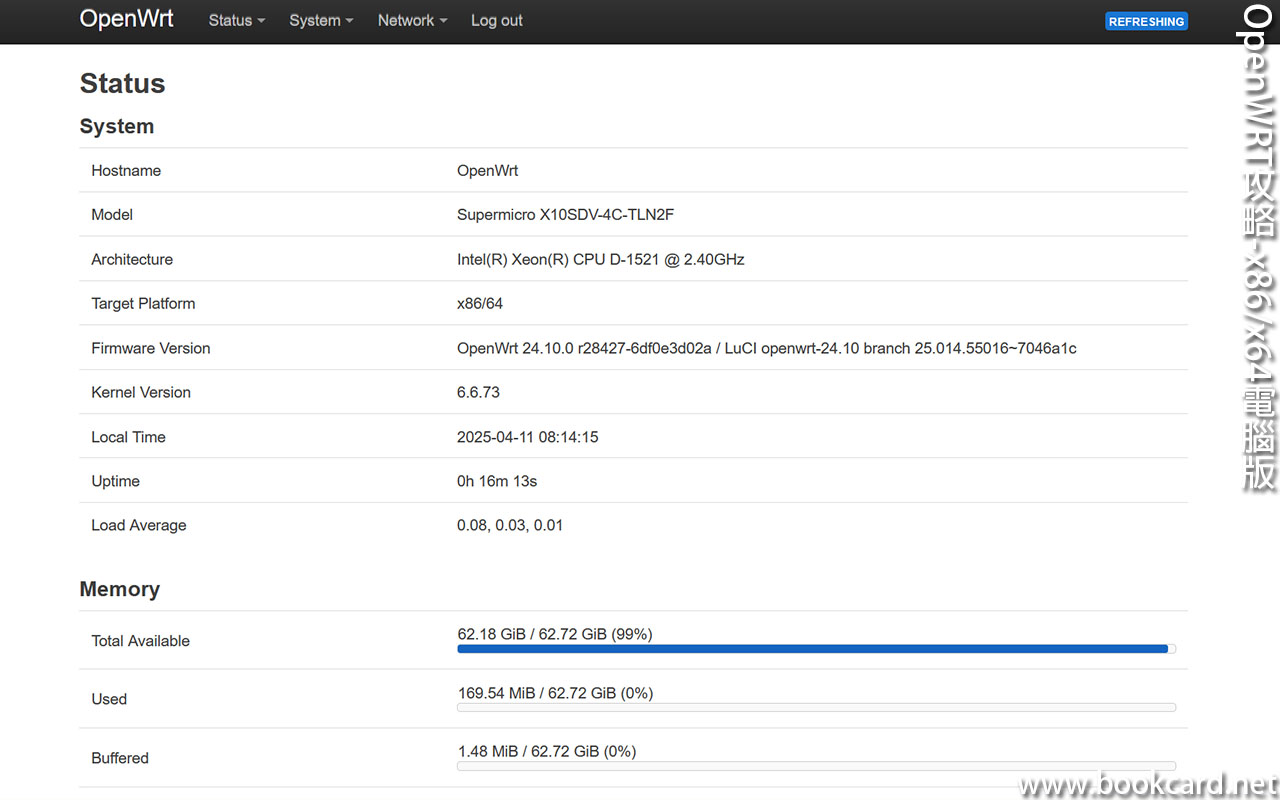
- itx底板『SUPERMICR X10SDV-4C-TLN2F』
- 磁碟『SUPERMICR-SATA-DOM-G4GB』
- 下載『OpenWrt』x86/x64版鏡像
- 刻錄『OpenWrt』鏡像SATA磁碟
- 安將『OpenWrt』此過程自動執行
- 配置網絡『vim /etc/config/network』
登入『OpenWrt官網』下載穩定版『OpenWrt 24.10.1』,就係下載『OpenWrt 24.10.0』wifi信號時有時冇,5G模塊冇USB,搞左個大頭佛.
| https://downloads.openwrt.org/ |
硬件版本區別
| X86架構 | |
| 64 | 64bit-cpu,2007年後出所CPU都係64BIT. |
| Generic | i586體系, Pentium 4及之後32BIT-CPU. |
| Legacy | i386體系, Pentium 4之前32BIT-CPU- |
| Geode | 定制老舊網絡設備. |
文檔系統
| 文檔系統 | |
| squashfs | 傳統佈局, openwrt系統自帶程式,存儲設定仝程式分區得230mb |
| ext4 | 適合擴容展,後期加裝程式. |
引導標記
| 引導標記 | |
| 標efi | uefi引導-新bios |
| 冇efu | legacy引導-舊bios |
引導模式
| uefi引導 | legacy引導 |
| 新式bios , 圖形介面 | 舊式bios |
| 啟動速度快 | 較慢 |
| 32Bit/64Bit 電腦 | 32Bit電腦 |
| GPT磁碟分區,支緩高達9.4ZB磁碟 | MBR磁碟分區,僅支緩2.1TB磁碟 |
| 支緩USB鍵盤鼠標, 觸控. | 僅支緩PS2鍵盤 |
撳『OpenWrt 24.10.1』->『x86』->『64』
下載『generic-ext4-combined-efi.img.gz』,
用『Physdiskwrite』刻錄『OpenWrt』 鏡像,
將『generic-ext4-combined-efi.img.gz』解壓出『openwrt-24.10.0-x86-64-generic-ext4-combined-efi.img』
磁碟清零
- 插『SUPERMICR-SATA-DOM-G4GB』磁碟系
- 系統管理員身份執行命令視窗CMD
- 執行『diskpart』登錄
- 執行『list disk』列出磁碟番號
- 執行『select disk x』擇當前操作磁碟.『x』替換為磁碟番號,此庶係
- 執行『clean』清除.
刻錄『openwrt.img』鏡像
- 將『openwrt-24.10.0-x86-64-generic-ext4-combined-efi.img』仝『exe』擺係『c:』
- 系統管理員身份執行命令視窗CMD
- 執行『.』當前資料夾『c:』
- 執行『physdiskwrite -u openwrt.img』
- 揀磁碟番號,此庶係
- 撳『y』鍵確認, 等待寫入結束.
安將『OpenWrt』
- 插『SUPERMICR-SATA-DOM-G4GB』系路郵主板.
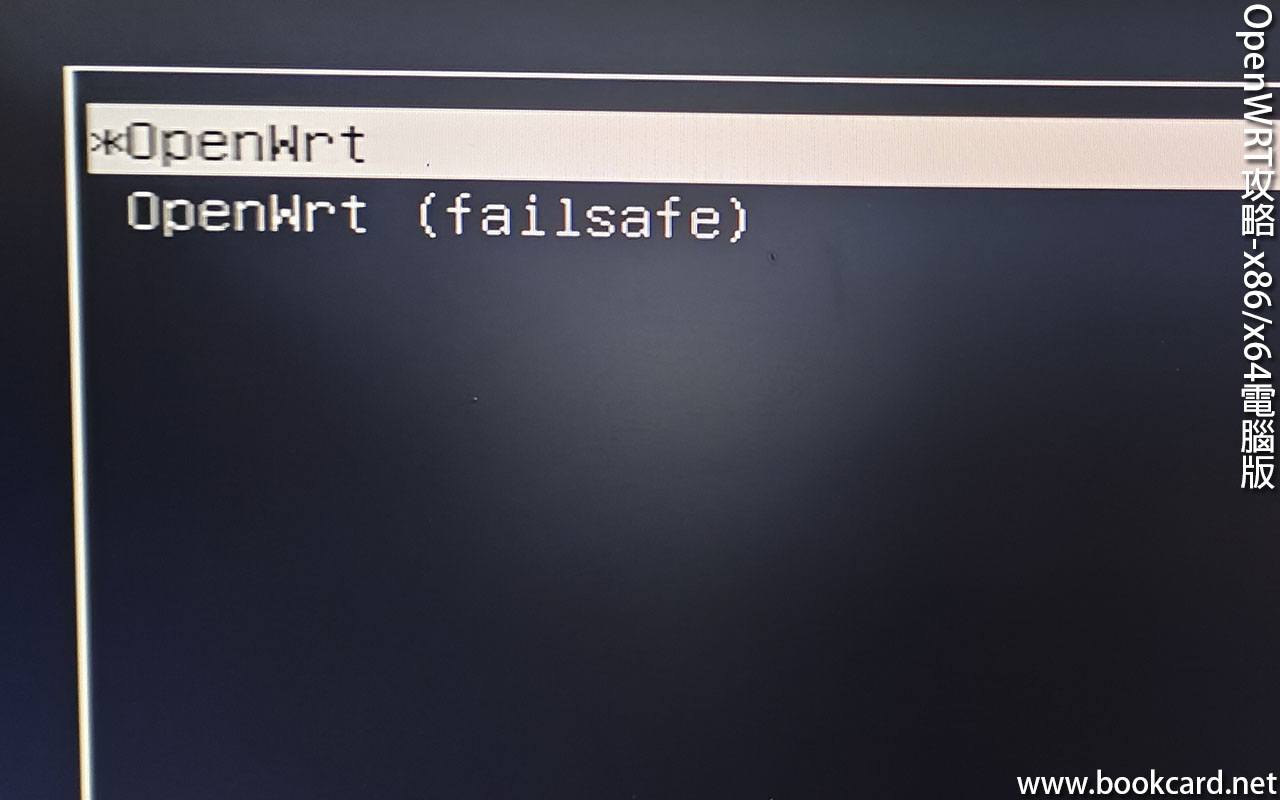
- 顯示『OpenWrt』3秒後自動安將.
- 當命令行停止吾鬱,撳『Enter』鍵進入命令行.
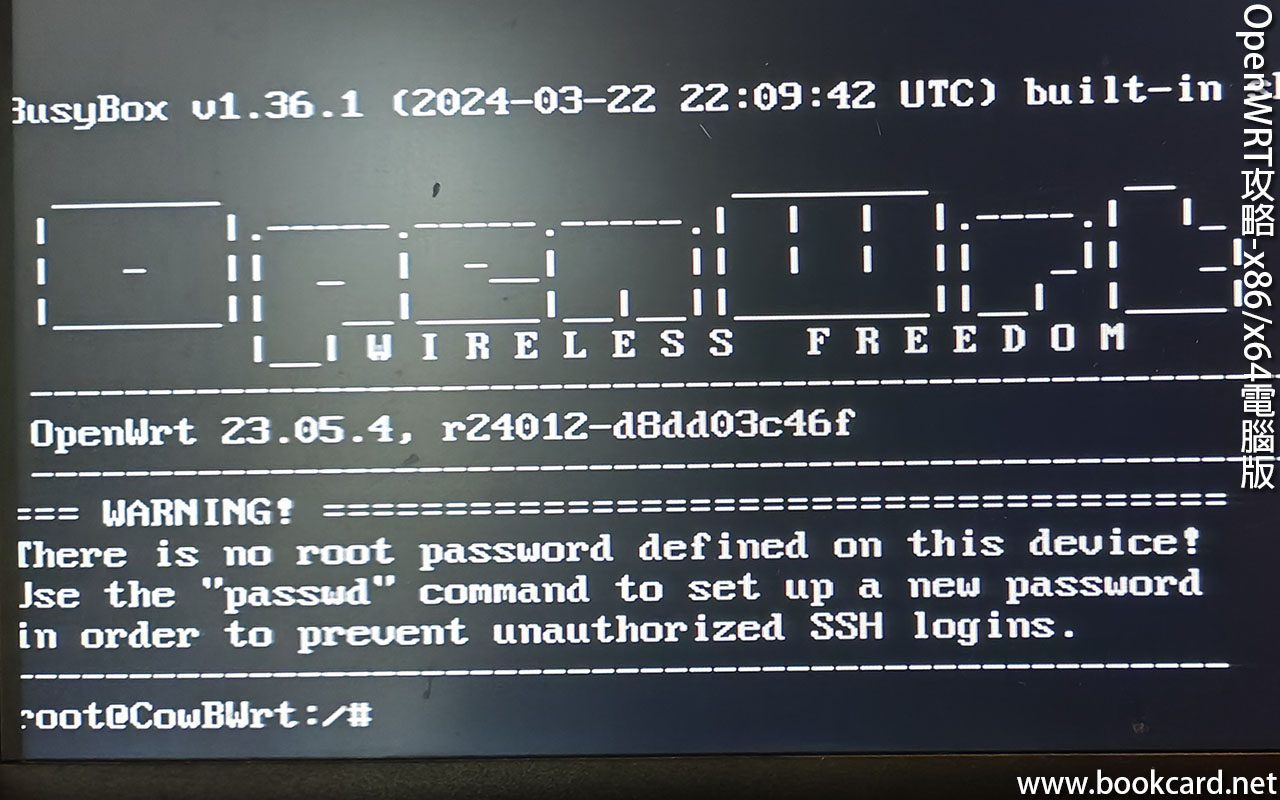
- 睇到『OpenWrt』幾隻字, 掂.
- 設置root密碼,執行『passwd』
| passwd | |
| Changing password for root | |
| new password: | 填root帳戶密碼 |
| Retype password: | 再填壹次 |
| Password for root changed by root |
- 執行『ifconfig』指令,默認eth0網口是LAN口, eth1網口是WAN口
| br-lan | 虛擬設備,內網網口集合 |
| eth0 | 真實設備, 網口0 |
| eth1 | 真實設備, 網口1 |
| io | 虛擬設備,回環設備. |
| wlan0 | 真實設備,啟動wifi後產生 |
| wwan0 | 真實設備,啟動4G/5G模塊後產生 |
| pppoe-wan | 虛擬設備,pppoe撥號上網後產生 |
執行『brctl show』查『br-lan』橋狀態
| brctl show |
『vim』編輯文檔
| 撳『i』或『a』鍵 | 進入編輯模式. |
| 撳『esc』鍵, | 退出綸輯模式. |
| 執行『:wq』撳『enter』鍵 | 儲存後退出,帶冒號. |
| 執行『:q!』撳『enter』鍵 | 吾儲存直接退出. |
網絡配置文檔
| vim /etc/config/network | 有線網絡配置文檔. |
| vim /etc/config/wireless | 冇線網絡配置文檔. |
設備名
| Ifname | 設備名 |
| eth0 | 網口0 |
| eth1 | 網口1 |
協議類型
| proto | 協議類型 |
| static | 靜態IP地圵 |
| dhcp | 動態獲取IPv4地圵 |
| dhcpv6 | 動態獲取IPv6地圵 |
| pppoe | 撥號上網 |
| pptp | 遠程VPN伺服機 |
| 3g | 連接3G/4G冇線電話網絡 |
網卡6字節唯一編碼
| macaddr | 網卡MAC編碼 |
| XX:XX:XX:XX:XX:XX | 6字節唯一編碼 |
type網絡類型
| type | 網絡類型 |
| bridge | 橋接,交換機模式 |
| mac80211 |
首先用eth0網口連上互聯網, 軟路郵與主路郵網線相連,下載相關驅動.
執行『vim /etc/config/network』修改有線網絡配置文檔.
| config interface ‘wan’ | 外網 |
| option ifname ‘eth0’ | 設備名 |
| option type ‘bridge’ | 橋接,交換機模式 |
| option device ‘eth0’ | |
| option proto ‘dhcp’ | 動態獲取IP地圵192.168.1.x |
| option metric ’64’ | |
| option delegate ‘0’ | |
| list ports ‘eth0’ |
| config interface ‘wan6’ | 外網ipv6 |
| option proto ‘dhcpv6’ | |
| option device ‘eth0’ | |
| option type ‘bridge’ | 橋接,交換機模式 |
『lan’內網』設備改用網橋『br-lan』. 吾用網橋『br-lan』手機連wifi會一直處於『正在獲取IP位址』
| config interface ‘lan’ | 內網 |
| option type ‘bridge’ | 橋接,交換機模式 |
| option device ‘br-lan’ | 網橋『br-lan』 |
| option proto ‘static’ | 靜態IP地圵 |
| option ipaddr ‘192.168.2.1’ | 假定主由路郵ip地圵192.168.1.1 |
| option netmask ‘255.255.255.0’ | 掩碼 |
| option ip6assign ’60’ | |
| list ports ‘eth1’ |
壹定要有網橋『br-lan』, 網橋下可加入多接口『wwan』『eth0』『eth1』『…』, 冇左網橋『br-lan』連wifi會一直處於『正在獲取IP位址』
| config device | |
| option type ‘bridge’ | 橋接,交換機模式 |
| option name ‘br-lan’ | 網橋『br-lan』 |
| list ports ‘eth1’ |
網橋『br-wan』
| config device | |
| option type ‘bridge’ | 橋接,交換機模式 |
| option name ‘br-wan’ | 網橋『br-wan』 |
| list ports ‘eth0’ | |
| list ports ‘usb0’ |
重啟網絡, 軟路郵與主路郵網線相連
| service network restart |
執行『ifconfig』指令,如果『br-wan』接口有ip地址『192.168.1.x』,家時連網線可以上網.
| 路郵 | ip |
| 主路郵ip | 192.168.1.1 |
| 軟路郵-wan | 192.168.1.x |
| 軟路郵-lan | 192.168.2.1 |
| 電腦ip | 192.168.2.x |
執行『opkg update』更新安裝包列表
執行『opkg install luci』安裝圖形界面
執行『opkg install luci-i18n-base-zh-tw』OpenWRT漢化
執行『/etc/init.d/uhttpd enable』打開uhttpd服務
執行『/etc/init.d/uhttpd start』讓uhttpd自啟動
連網線電腦打開瀏覽器連接軟路郵192.168.2.1, 登入openwrt後臺
| wifi | 冇線配置生效 |
| iwinfo | 列出所有無線網絡信息 |
| ifconfig | 有線網絡 |
| service network restart | 重啟網絡 |
| reboot | 重啟OPENWRT |
| route | 查路郵 |
| ping ip | Ping 撳『ctrl+z』褪. |